Python Tutorial: Government Social Media Analyser Class Build Out
In this exercise, we will convert our initial program (
refer to the first tutorial) to a general purpose program for fetching twitter information of parliaments member of a country. This means we do the first iteration of generalization and refactoring of our code.
Generalization Step 1
Our ambition is to have a program which can analyze Twitter accounts of politicians of any country not only Switzerland.
For example, there is a Twitter Government account (
https://twitter.com/TwitterGov) which have various Twitter lists of the government of multiple countries.

So our program should be generalized in a way that we can use it (i.e., configuring) for other countries as well.
The Yaml Configuration File
Our first
lesson1.py Python program was hard coding the twitter account- and its list name directly in the program itself.
Now what we want to do is to read this information out from a configuration file, similar to what we have done for passing in the Twitter API secrets in the first lesson (
refer to the tutorial)
This information isn’t any secret one, so we create a new public yaml configuration file, which will be used for any
country-configuration parameters of our program. Having all these parameters offloaded to a configuration file is a crucial point when you generalize programs.
As you can see in the screenshot below, we name the file
config-CH.yaml.

So why to use the
CH post-fix? Well the
CH postfix is the Alpha-2 code of the international
ISO-Country Code standard for Switzerland. Code values (or reference values) are the ingredient of any program to encode information. Best practice is to use standardized one if possible (don’t reinvent the wheel here). I.e., for countries we decided to use Alpha-2 code of the standard ISO 3166-1. As you will see later for encoding languages, we take a similar approach. ISO, by the way, means “
International Organization for Standardization.”

Refactoring and Enhancing
The GovernmentSocialMediaAnalyzer Class
For our generalized program, we do a first
refactoring step. Code refactoring is the process of restructuring existing computer code without changing its external behavior. So we rephrase our class in
sample1.py to
GovernmentSocialMediaAnalyzer and enhance its class constructor
init method by a parameter
country_code. We took a design decision, that.
Design Decision 1: An instance of our class GovernmentSocialMediaAnalyzer will encapsulate the data and behavior of a dedicated country.
The code enhancements are shown below:
-
The passed in country_code parameter (e.g., CH) during class creation
-
will be stored as a private instance variable country_code and used
-
to create the yaml configuration file_name,
-
from where we will load the configuration data and store the data in the private variable cfg

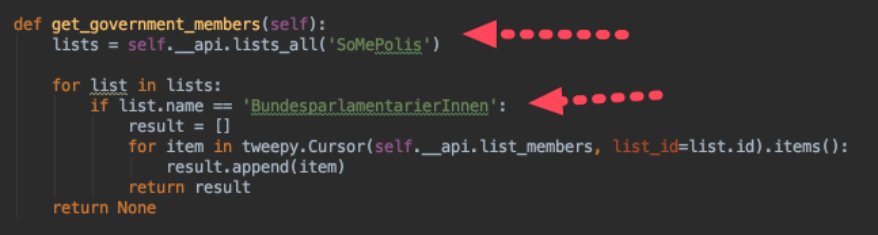
So now we are ready to generalize our
get_government_members
method by reading the twitter account- and list-name out of the configuration data, which is stored in
self.cfg instance variable.
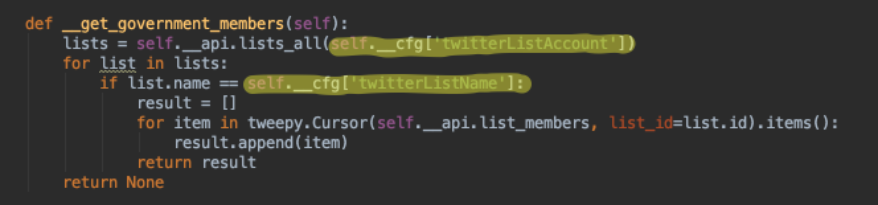
Our program is now ready for any country. I.e. we could use it for any government list of the
https://twitter.com/TwitterGov. store the relevant information in a corresponding configuration file, i.e.
config-US.yaml (for a US government list) and retrieve the account information.
Enhance the init method
But le’ts finalize first the refactoring and enhancement of our
init class. We take another design decision
Design Decision 2: The init method should encapsulate the loading of all Twitter accounts of the list from Twitter, as well as the conversion to the relevant attributes in attributes column (= array of Strings). The column should be made available as private class instance variables
That means when we create a
GovernmentAnalyzer instance for a dedicated country, the initialization phase of the case will include the all the necessary steps to get the data from Twitter into our intern data structures (as represented as columns)
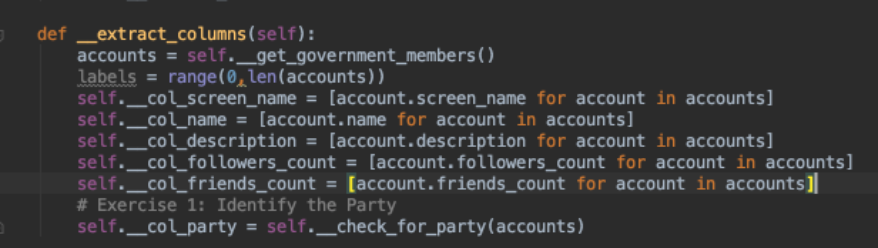
We will do this step in a dedicate helper method, which will be called
extract_columns..
The refactored class out of lesson 1 now looks like this. We made the column attributes more descriptive and defined them as class instance variables so that the columns can be used by any method within our class.
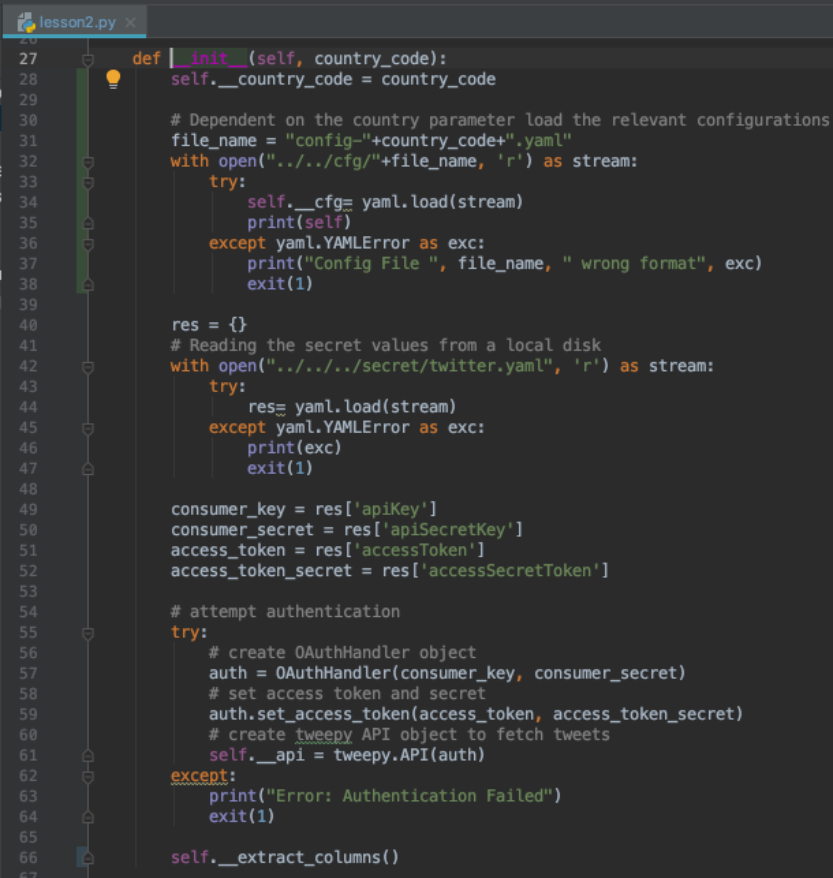
So we have finalized and refactored the class instance creation class
-
30-38: code block to load the country-specific configuration file
-
51-64: code block to read the twitter security token and keys from the secret configuration file and then connect to the Twitter API
-
66: call to the _extract_columns method to retrieve the data and convert it into columns
Generalization Step 2
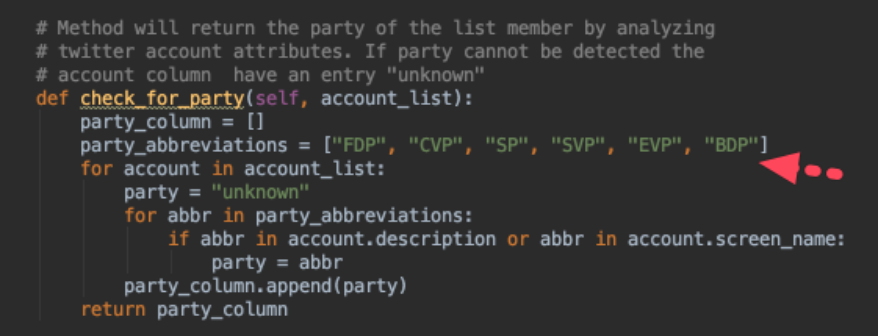
Our
check_for_party algorithm of tutorial one was hard coding the party abbreviations in the code itself.
Well, let’s refactor the code and move the party information to our configuration file. Thanks to the flexibility of the YAML file, this can be done quite easily.
Design Decision 3
: We want to use several party abbreviations (potentially in multiple languages) and keywords (e.g. the parties Twitter screen-name) per party to try to identify the party ownership of a politician.
So our configuration
config-CH.yaml will require configuration information per party. A list of parties and their abbreviations can be found on
parlament.ch in four languages for Switzerland.
In YAML you can easily build up a list of configuration items (e.g. a party configuration item). List members are denoted by a leading hyphen (-) with one member per one to multiple lines, or enclosed in square brackets ([ ]) and separated by comma space(, ).
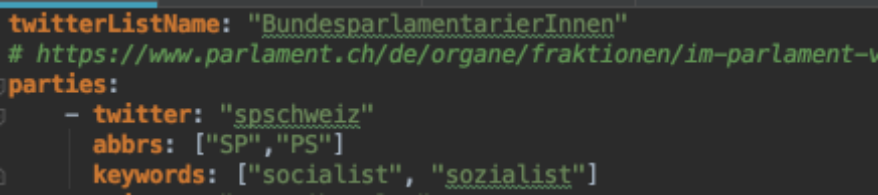
In our YAML file
-
a party list member is denoted by the hyphen notation. A party-list member has a twitter and abbrs attribute. The abbrs (abbreviations) attribute itself is a list of string denoted by the square bracket notation.

If we check the loaded configuration file (stored in the
self.cfg variable) in the Python debugger, it should be clear how the data structure is looking like using Python lists and dictionaries.
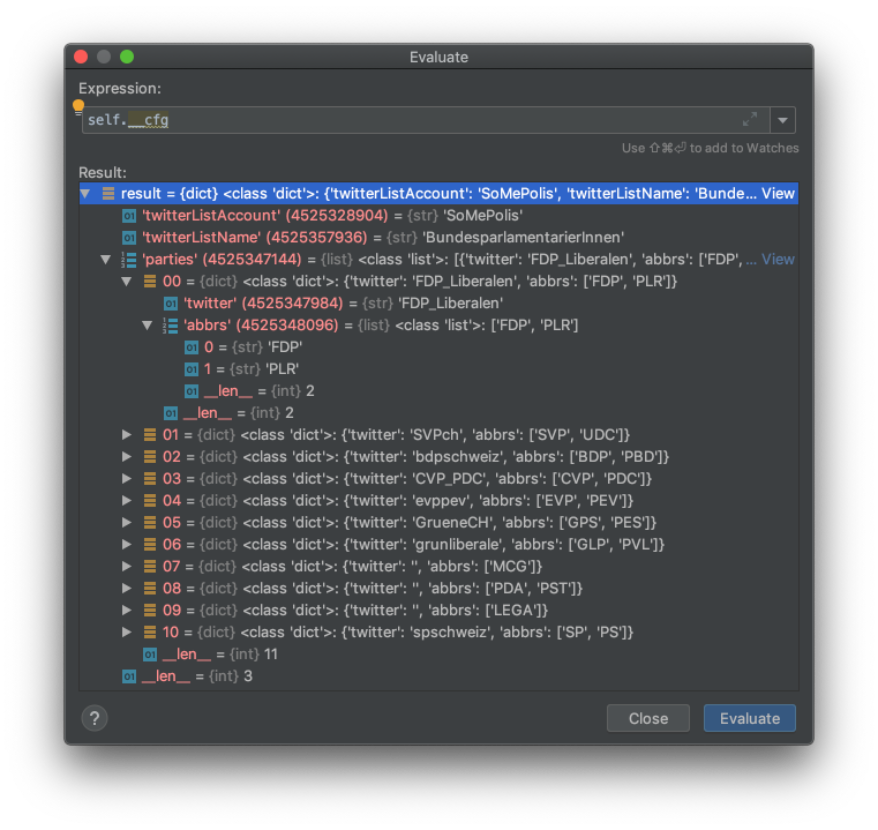
A side-remark to the
abbrs attribute, we introduced their a list of party abbreviations, i.e. having multiple national languages means also that a party has multiple abbreviations (e.g. for German and French). In our case above “FDP” and “PLR”. And we want to check for all of them. In other countries, there may be potentially just one abbreviation, but with decision, we are future proof.
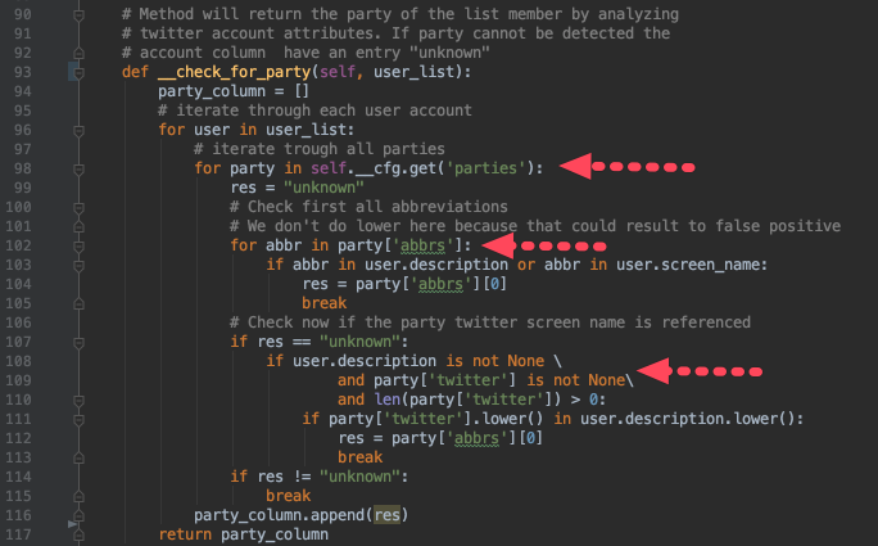
Our improved
check_for_party method nows look like follows. It will iterate over all twitter accounts and each parties configuration record and checks if the twitter account has a match in its description or screen_name to a party.
-
On line 98,102 and 110 we are getting the data out of our configuration structure.
-
Dependent on the attribute type, we have to iterate over the list of values (98, 102) or fetch the data directly (112)
-
If we have a match, the first abbreviation will be returned, as our code value to identify parties: res = party[‘abbrs’][0]
Fine Tuning the Algorithm
Introducing a Second Plotly Table: Grouping Accounts by Party
In order to fine tune our algorithm, we have to check its effectiveness on finding a party to twitter account. For that we have to introduce a second table, which will group our twitter accounts according their party allocation.
Obviously the powerful panda package will provide us the necessary tooling. You can refer to the
following panda API description
with all the details how to group data.
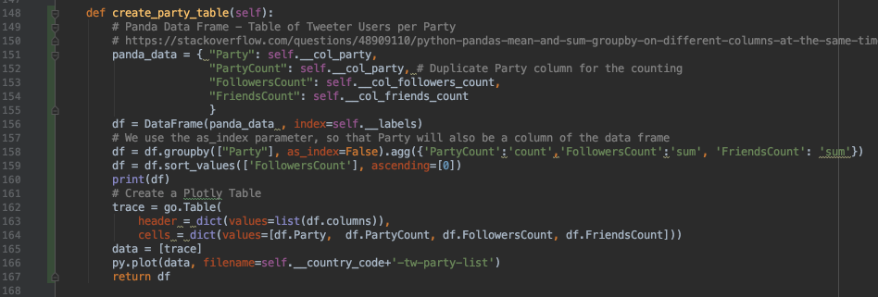
Some comments to the code fragment:
-
151-155: We are creating here a panda_data record consisting of 4 columns. The
col_party, col_followers_count, col_friends_count. The col_party is used twice, the first column is used for labelling each row (as you see on line 158 we do the grouping by party) and in the second column we do sum up of the rows which have the same party, -
157: We create a first panda data frame of this table with the four columns
-
158: Here we transform the created data frame by using the groupby function. We also define the aggregation agg operations for the 2nd, 3rd and 4th row.
-
162-166: The basic stuff to create a nice plotly table.
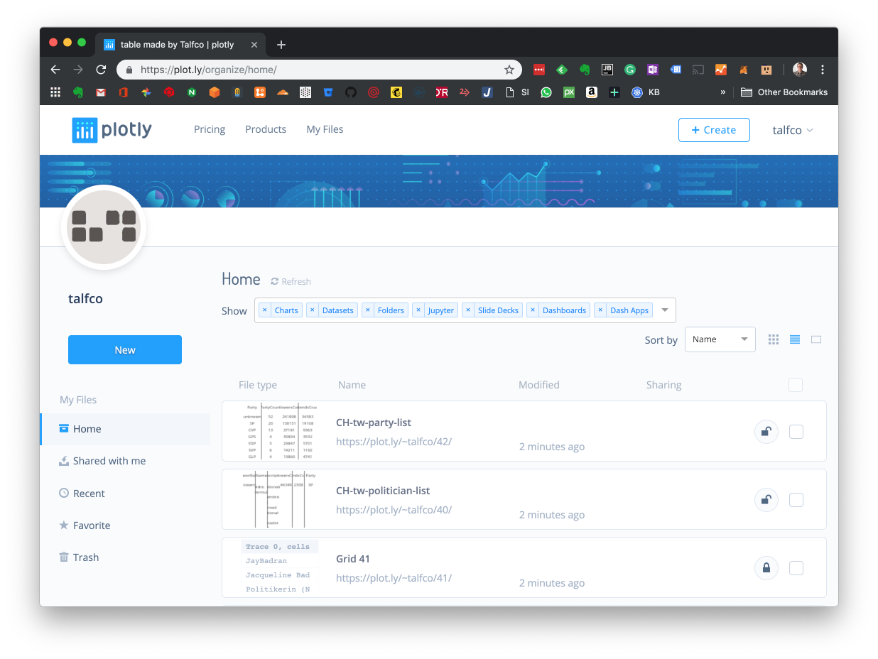
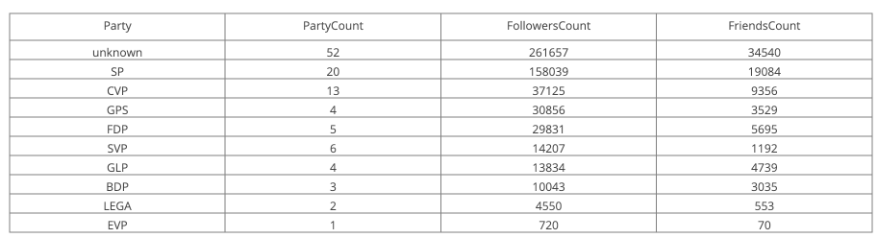
Let’s run the program and check the accuracy of our party assignment allocation algorithm. As a result of the program execution you will now have to tables in your plotly account (also some grid tables will be created, which are not relevant at the moment).
Enhance our Config File with Keyword Attribute
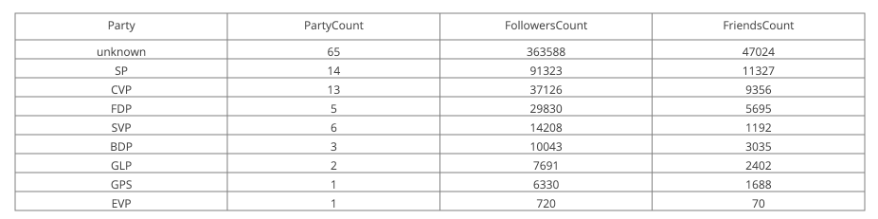
Our first run shows, that the majority of the politician (65) don’t mention their party abbreviations or party twitter screen_name in their account description/screen_name.
So let’s try to fine tune our algorithm. Let’s go through the list once again and check for other keywords which could help us to identify their party relationship.


We found the following key words:
-
socialist (SP)
-
glp (GLP),
-
Grüne (GLP)
-
@lega (Lega)
So let’s add this one to our configuration file with a new attribute:
keywords. That’s the beauty of YAML you easily can extend with additional attributes. In our case another list attribute. As for example:
And we add the additional check in our check_for_party method
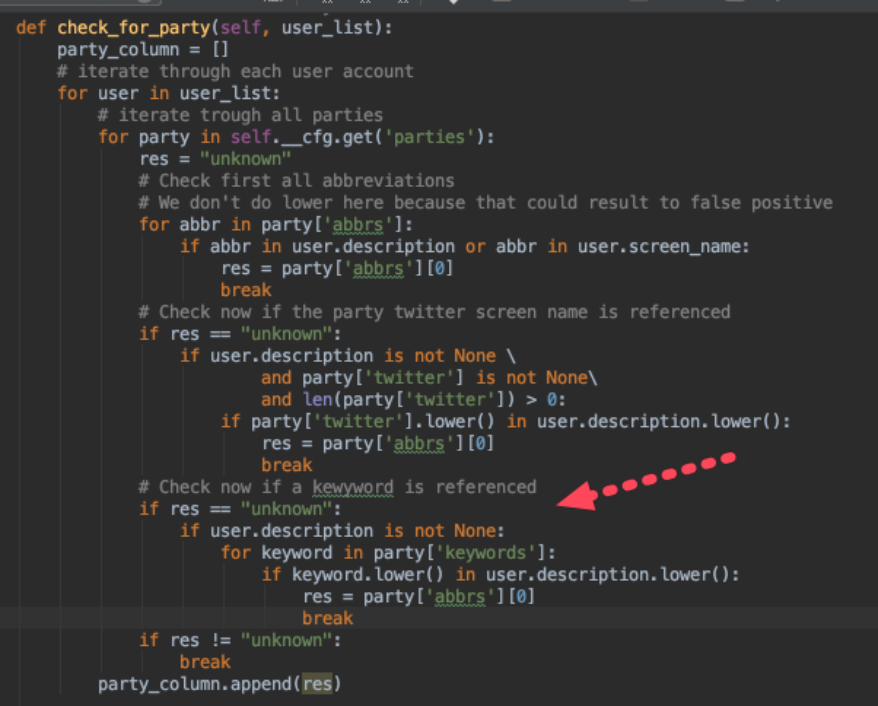
Et voila, we could identify 13 additional twitter accounts with over 20’000 followers. Still, 52 accounts can’t be mapped to a party, but for that, we have to connect another data source, which will be done in a later tutorial.
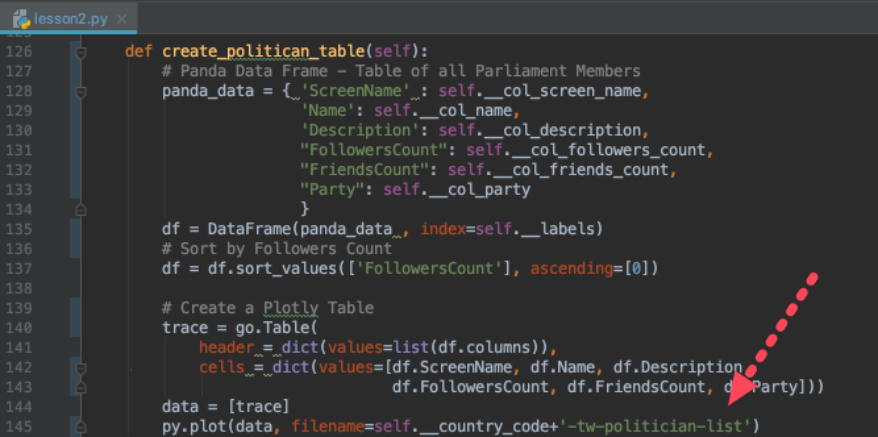
As a final step for today, we refactor the
create_politican_table method. Mainly we standardize the file name used in plotly by using the country code in the file name. That allows us to generate tables for different countries and ensuring that they are not overwriting each other in our plotly account.
Wrap Up
There we are, we have now generalized and refactored our overall application and have good foundation backed by a configuration file for a further build out.
We can now instantiate a
GovernmnetSocialMediaAnalyzer for a dedicated country (supposing that we have provided the necessary configuration file) and extract twitter relevant data into a plotly table for further processing.

As a UML Sequence Diagram visualized, the interaction flow of our class can be represented as follows:
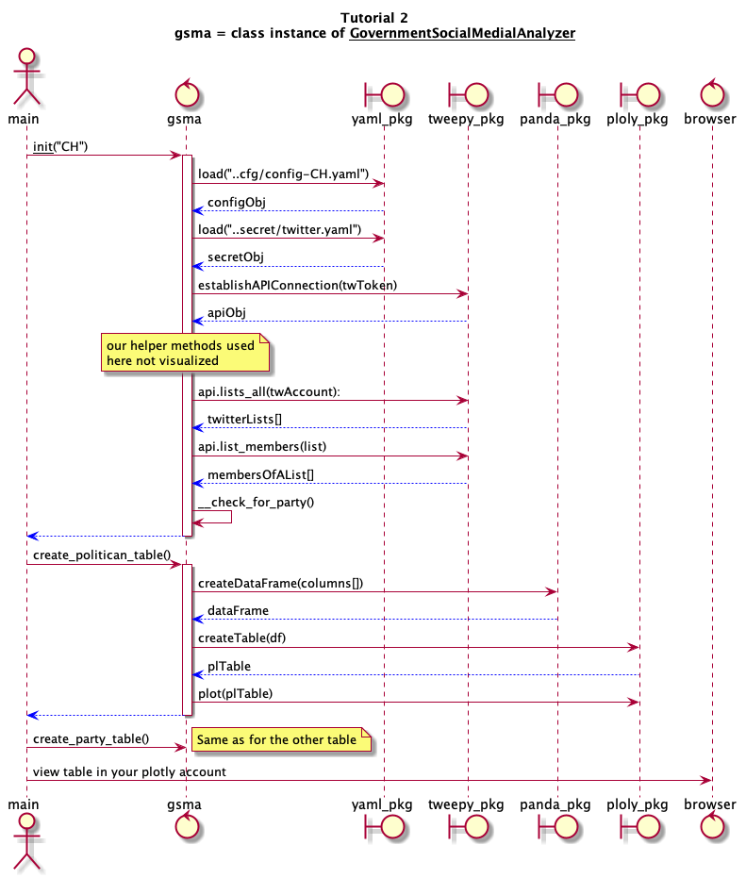
If you want to understand more details about UML sequence diagrams, refer to the following
tutorial. It’s an excellent technique to visualize various aspects of a program. In the above diagram, the return calls of a message are depicted in blue.
As an example: The message line to the panda package to create a data frame is depicted in red (
createDataFrame), its return message line of a
dataFrame object in blue.
Exercise
Use one of the lists offered via the Government Twitter account (
https://twitter.com/TwitterGov
), for example the list of UK member of parliaments (
https://twitter.com/TwitterGov/lists/uk-mps).
-
Work out at corresponding yaml configuration file
-
Check out what kind of information could be used to identify the party of the politician.
-
Enhance the keywords with your findings
-
Enhance the main program with a user input question, something like “Which government do you want to analyze”. Provide a list of available configurations and then run the program with the user selection.
-
Think about the changes necessary in order to analyze multiple politicians lists per country. I.e. we want to differentiate multiple government bodies per country and have that generalized in the configuration files.
Source Code
This blog entry was fully produced within Evernote and published using the
Cloudburo Publishing Bot
.
comments powered by Disqus