Java for Beginners #2 - Maven Primer and Understanding API's
In this lesson, we complete the project preparation steps for our Football App and introduce the concepts of a RESTful API, the Application Programming Interface we use to get football data from
http://www.football-data.org/index
The goal of the football-data API is to provide football data of all major european leagues in a machine-readable way. By data I mean fixtures, teams, players, results and more. All this information is provided via an easy-to-use RESTful API in JSON (only) representation.
Prerequisite
- You have completed the first session and have a IntelliJ Project ready: Java for Beginners #1 - Prepare an IntelliJ Maven Project
Understanding Your Maven Project
Open your “FootballApp” project in the IntelliJ IDEA. You should see a window, which looks like the following
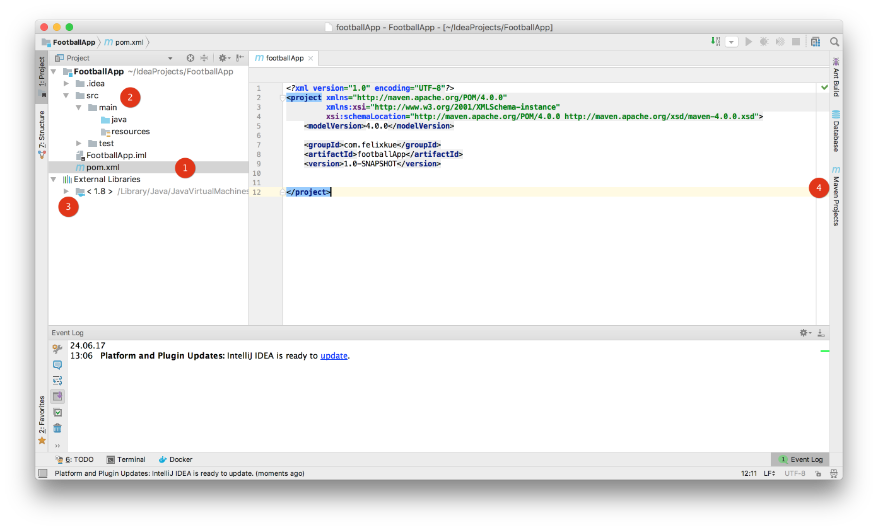
The IntelliJ User Interface consists of multiple Windows (which can be switched or closed and configured for your needs). Let’s start with the most important one
- Top Left displays by default the Project Window, which gives an overview of you project file structure.
- Top Right displays the Editor, where you write your code.
- Bottom displays the Event Log
Tip: You can find here the official
Guided Tour around the User Interface from IntelliJ, which gives an in-depth overview.
To the Call-Outs in the above screen shot:
- Because we selected a Maven Project Type in the last session, IntelliJ configured this Project with a pom.xml, which is the so-called PrOject Model. It is an XML file that contains information about the project and configuration details used by Maven to build the project. It was created by default by IntelliJ and contains all the necessary information to build your project (i.e. compiling, building a jar). The content of the pom.xml can be seen in the Editor Window. You will recognise the groupId and artifactId XML elements, which contain the values, which you provided in session 1.
- IntelliJ also created the project default directory and file structure.
- src/main/java will be the folder where you Java source files will be stored
- src/main/test will be the folder where you Java source test files will be stored
- .idea is a folder used by IntelliJ for its purpose and you will not require it
- In the External Libraries folder, IntelliJ lists all Java libraries which are used in your project. In our case we require the Java JDK 1.8 libraries. If you open the folder, by double clicking it, a list of jar files will be shown, which are making up the Java JDK.
- On the right side, you have a toolbar, where you can open additional tool windows. In our case we are interested in the Maven Project window
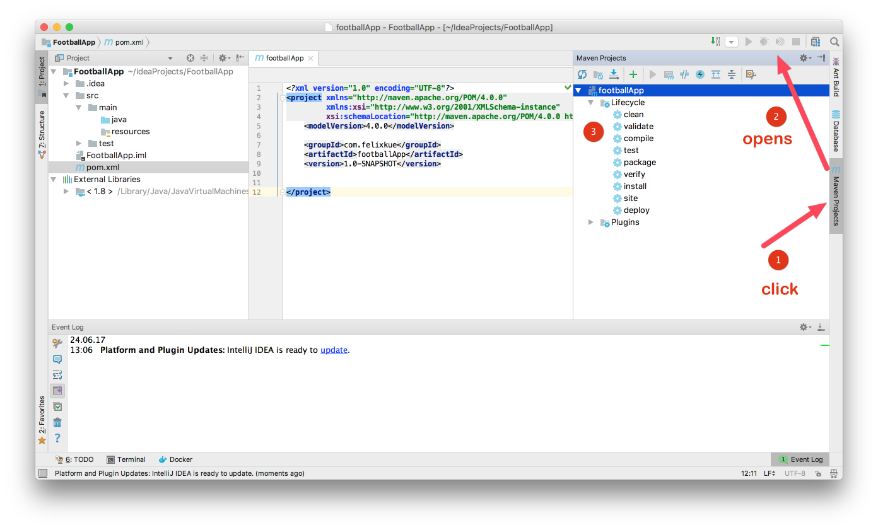
Open the Maven Tool Window:
- Click on Maven Projects in the toolbar
- The Maven Tool Window will be displayed of your footballApp project (it’s the name you configured in the artifactId)
- Drill down in tree to the Lifecycle node and open it. You will see a list of Lifecycle Commands, as for example clean, validate, compile and so on. It’s on of the main concepts in Maven.
Maven Lifecycle Commands
Maven is based around the central concept of a build lifecycle. What this means is that the process for building and distributing a particular artifact (project) is clearly defined.
For the person building a project, this means that it is only necessary to learn a small set of commands to build any Maven project, and the POM will ensure they get the results they desired.
As you may already guessed, you can now for example
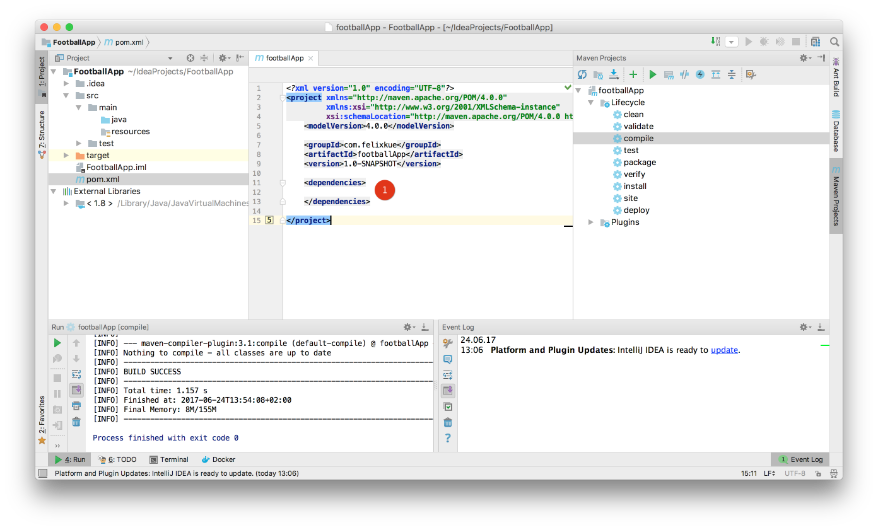
compile your project. There is no java source code yet, but let’s do the check if everything in Maven is correctly set up
- Double click on the compile Lifecycle command
- You will see that in the bottom of the Window, yet another Tool Windows (The Run Window) will be opened which shows the output of the Maven build process. You should see a “BUILD SUCCESS” message at the end.
- By clicking on the Icon in the upper right of the Run Window or on the highlighted entry (4: Run) in the bottom, you can hide the window (clicking the entry a second time will display it again). The same holds true for the Maven Projects Window.

Extending the POM.xml
As a preparation step for our next task, we will add the dependencies section in the POM.xml (this is section in the POM will allow us to define additional external library, which we require.
- Add the <dependencies> </dependencies> in the POM.xml
Adding the Apache HTTP Components Library to our Project
It’s time to introduce the term
API, which means an
Application Programming Interface. Check out this very helpful 3 minutes video to get a better understanding.
As you can see, API’s are ruling the world and allowing us to connect and glue together useful services to a new app. We will connect to the football-data API to get some interesting data about football. Well the
http://www.football-data.org/ API is based on
REST, yet another very important term in the API world, which you have to understand. Take another 8 minutes time to grasp the concept in this video (which is quite straightforward)
Each good API comes with a documentation, which describes how you can communicate with it. This holds true for our API, which provides all the necessary information on their documentation site
http://www.football-data.org/documentation. The screenshot below taken from their site, shows the overall structure of their API. So you can retrieve data about
- Soccer Seasons
- Teams
- Fixtures
Quite cool isn’t it ? And that’s for free.

By drilling down into the documentation details you will find any kind of required information in order to connect from a program and retrieve the data.
As we have learned in the video, we have to use HTTP-requests in order to access the data. So from a Browser point of view that’s alright, but how to do that out of our program. The Java JDK libraries (which we have configured) don’t really provide any kind of libraries for that, so what to do now ?
Well we need here and
additional Java library, which does the main job for us. There are several libraries around which could help us to connect with a RESTful API. We decided to use the famous
Apache HTTPComponents library. It’s described as follows
The Apache HttpComponents™ project is responsible for creating and maintaining a toolset of low level Java components focused on HTTP and associated protocols.
The Hyper-Text Transfer Protocol (HTTP) is perhaps the most significant protocol used on the Internet today. Web services, network-enabled appliances and the growth of network computing continue to expand the role of the HTTP protocol beyond user-driven web browsers, while increasing the number of applications that require HTTP support.
Designed for extension while providing robust support for the base HTTP protocol, the HttpComponents may be of interest to anyone building HTTP-aware client and server applications such as web browsers, web spiders, HTTP proxies, web service transport libraries, or systems that leverage or extend the HTTP protocol for distributed communication.
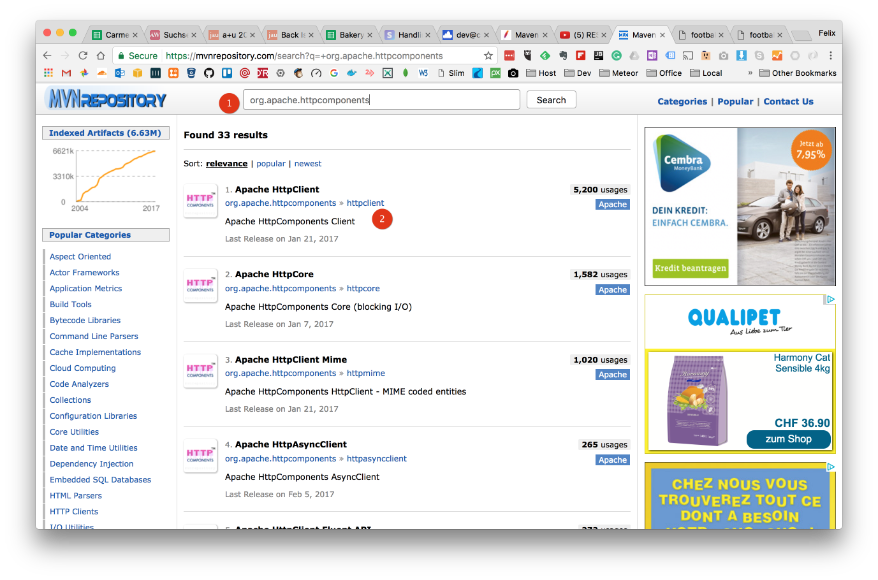
Instead of downloading the library from the Apache site, we will configure it via Maven.
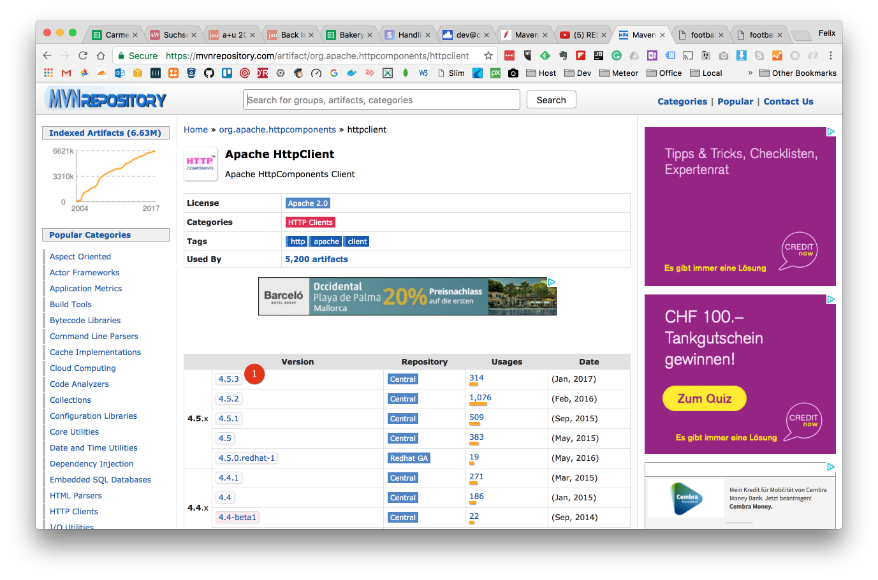
- So head over to https://mvnrepository.com and type in the name of the library we are looking for org.apache.httpcomponents
- There are several ones, we want the Apache HttpClient, click on it
The Apache HttpClient libary overview page will be shown. You will see a list of versions, which are available. We go for the newest one, which was released in (Jan 2017).
- Click on the version number 4.5.3
Now you are on the Library Version Page and will see at the bottom of the page a configuration string for Maven.
- Copy the full string from <dependency>…</dependency>
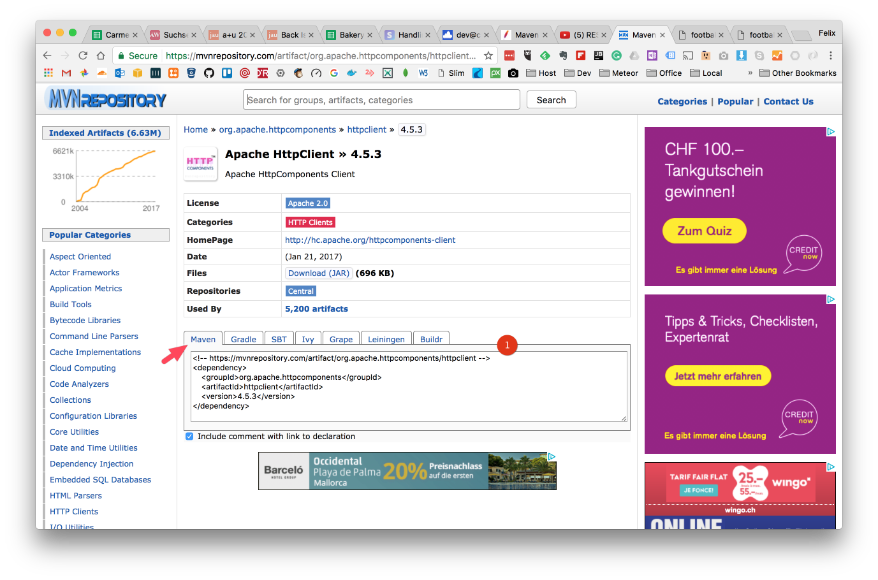
- In you IntelliJ project, paste in this Maven dependency in-between the dependencies XLM elements
- IntelliJ will now update the list of External Libraries. Beside the JDK 1.8 libraries you have a set of new libraries (brought in via Maven).
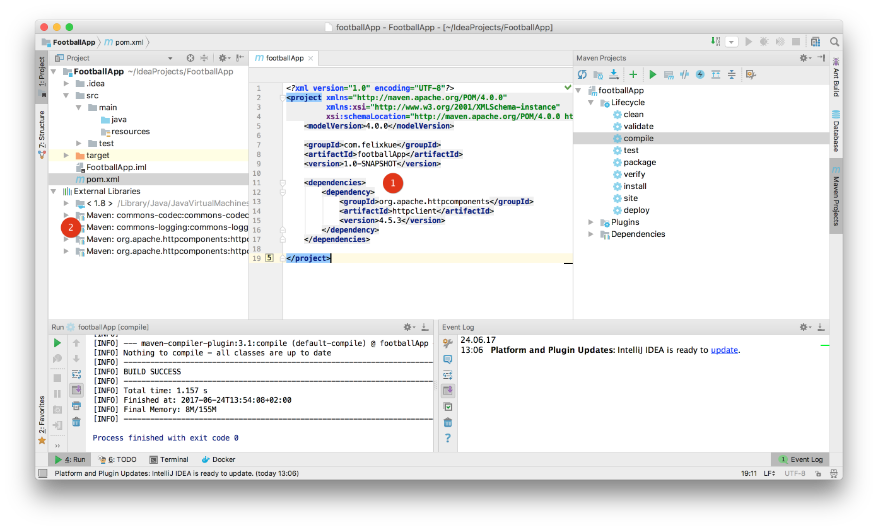
If you look carefully at the list of libraries you can see not just, the
httpclient library which we added but also list of additional libraries, as for example
httpcore ?
Why that ? Well
httpclient library itself is dependent on other libraries (apart from the Java JDK), i.e.
commons-code version 1.9, commons-logging 1.2,
httpcore 4.4.6. The Maven
Build Tool, ensures that all these are loaded as well, which makes your life easier.

That’s it for today, as you have learned, writing a program means also to collect useful libraries which are helping you in completing your development task. You don’t have to reinvent all the time the wheel and write all code from scratch. Rather watch out for open source libraries which can help you in full-filling a task and add them as external libraries to your project. Maven will help you to keep all the necessary libraries in sync and consistent. Good starting point
In the next session, we will write the first program, which will fetch data from the
football-data.org site in a machine-readable format.
This blog entry was fully produced within Evernote and published using the
Cloudburo Publishing Bot
.
comments powered by Disqus