The Anatomy of a EB based Microservice - Github Docker Integration
The article describes the fundamental steps for the base setup of the Amazon Elastic Beanstalk Runtime Configuration.
For handling S3 based configuration aspects of our Microservices we will setup a bucket, which holds any kind of file required by our Microservices.
In order to be fit for grow we will introduce a naming convention from start. An asset/configuration item required for our microservice ecosystem, will start with „
TST“, you should follow a similar strategy in your area.
Setup up a S3 Bucket for our Microservices
- We will call our Amazon S3 Bucket, using ms as an acronym for microservice.
- tst.ms.common.<region>
- The bucket will hold any data which is common to all our microservices.
- Be aware of that the S3 Bucket must be in the same region as your Elastic Beanstalk Instance, therefore we append the region postfix, e.g. tst.ms.common.us-west-2.
- With the region postfix, we can easily introduce the same bucket in other regions - in case we want to replicate our installations cross-region - following a clean and easy to understand name scheme.
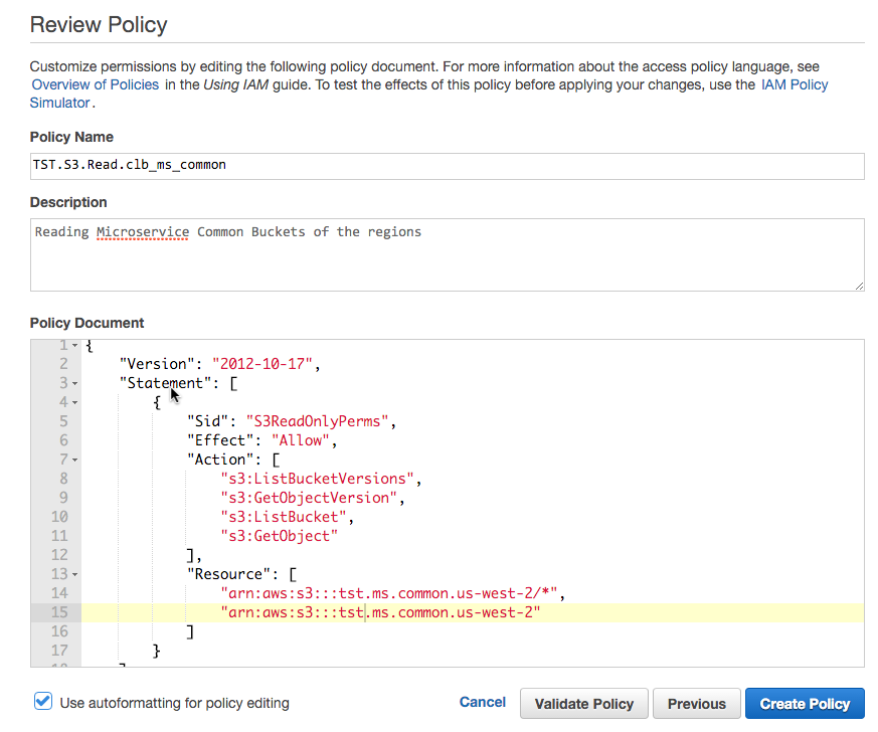
Create an IAM Policy for the S3 Bucket Access
- We create now an Amazon AWS Identity and Access Management(IAM) Policy, which is a read policy, which will be attached to any of our running microservices:
- IAM Policy: TST.S3.Read.clb_ms_common
- We will include here any common buckets of the various regions, for now we have only one
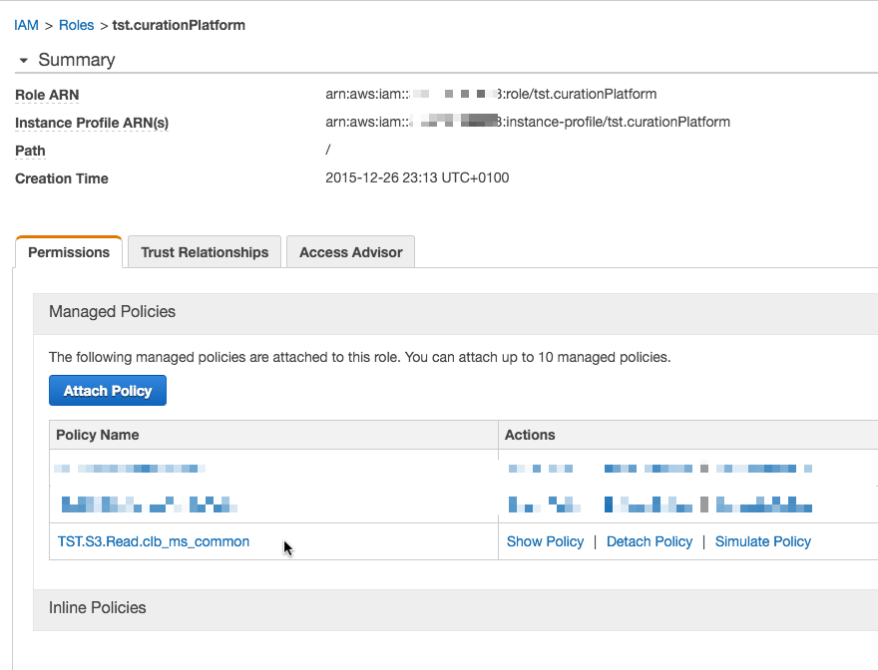
Allocate the policy to your IAM Role
Having defined a read policy, we have to attach now the police to our
Elastic Beanstalk instance profile.
Refer to the following article,
The Anatomy of a EB based Microservice - AWS Security Configuration, which describes how to setup an EB instance profile.
We will attach to the role the above created the bucket read policy.
So we have now a common bucket ready in our Elastic Beanstalk region, which is attached with read-rights to our EB instance configuration.
Now head over to your EB project which contains the EB Docker configuration.
Storing your dockerhub credentials required to access your private Github docker account
The common bucket will be used for storing your dockerhub credentials in order to allow EB to pull your private docker image. In case you are working with a public docker image this step is not required.
- As a first step store your github credentials in the common bucket, as for example in the file tst.ms.common.us-west-2/credentials.json
  {
        "https://index.docker.io/v1/": {
                "auth": "myauth1245=",
                "email": "[email protected]"
        }
  }
- You docker sensitive access data is now available to EB in a encrypted manner and secured at rest.
Configure the docker file in your Elastic Beanstalk Directory
- Add the following entry to your Dockerrun.aws.json. The file describes your EB single container docker configuration and the entry will tell EB where to find your authentication information to access your private docker hub repository.
    "Authentication": {
      "Bucket": "clb.ms.common.us-west-2",
      "Key": "credentials.json"
    },
- Finally add an entry where to find the docker image to the Dockerrun.aws.json file
    "Image": {
      "Name": „<dockerhubUsername>/curationplatform:v1.0.2",
      "Update": "true"
    },
- The overall Dockerrun.aws.json file will look like as following and EB will load your application from a private dockerhub repository.
  {
    "AWSEBDockerrunVersion": "1",
    "Authentication": {
      "Bucket": "tst.ms.common.us-west-2",
      "Key": "credentials.json"
    },
    "Image": {
      "Name": "dockerhubusername/curationplatform:v1.0.2",
      "Update": "false"
    },
    "Volumes": [
      {
        "HostDirectory": "/var/log",
        "ContainerDirectory": "/home/app/log"
      }
    ],
    "Ports": [
       {
         "ContainerPort": "80"
       }
     ],
    "Logging": "/var/log/docker.log"
  }
comments powered by Disqus