Python Tutorial: Connect Government Data API's By Using The Factory Pattern
Source Politican Data from Public Government Data API’s to Increase Allocation Accuracy
In this tutorial, we do mainly two steps
-
First of all we generate some plotly diagrams out of our collected data,
-
secondly we connect public government API to our program in order to retrieve government members and party assignment in a reliable way
As you already know we are interested in a generalized program, which can work with multiple countries. For that we will introduce an abstract class and the factory pattern for the second part of our tutorial.
But let’s start with the first quite easy task of generating two charts for our tables.
Plotly Chart Generation
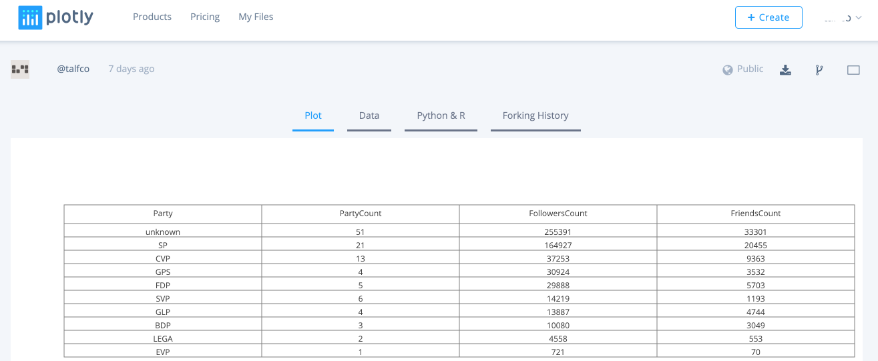
We create a bar chart as well as a pie chart. As a base we take the our plotly table
CH-tw-party-list.
The code is straightforward:
-
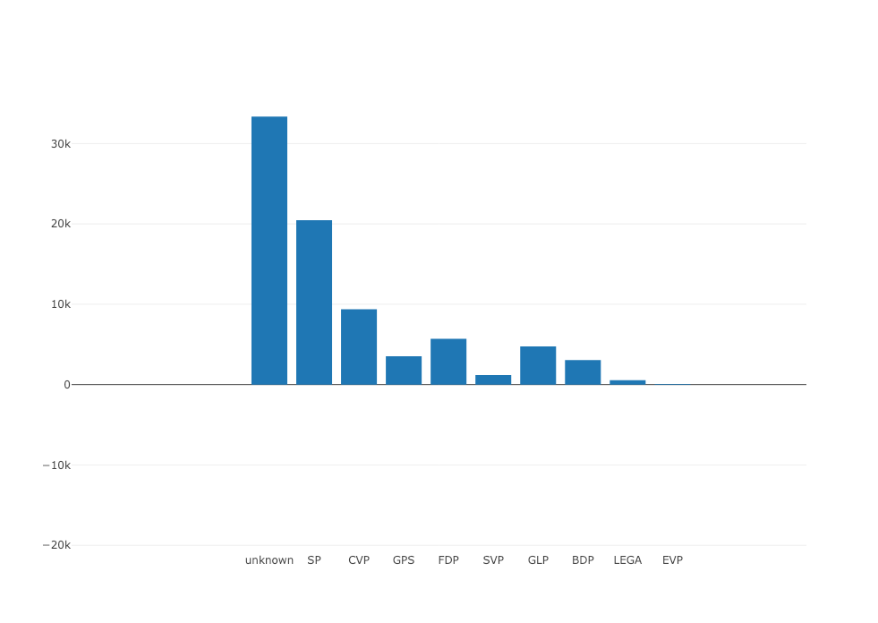
In the bar chart we visualize the accumulated friends count per party.
-
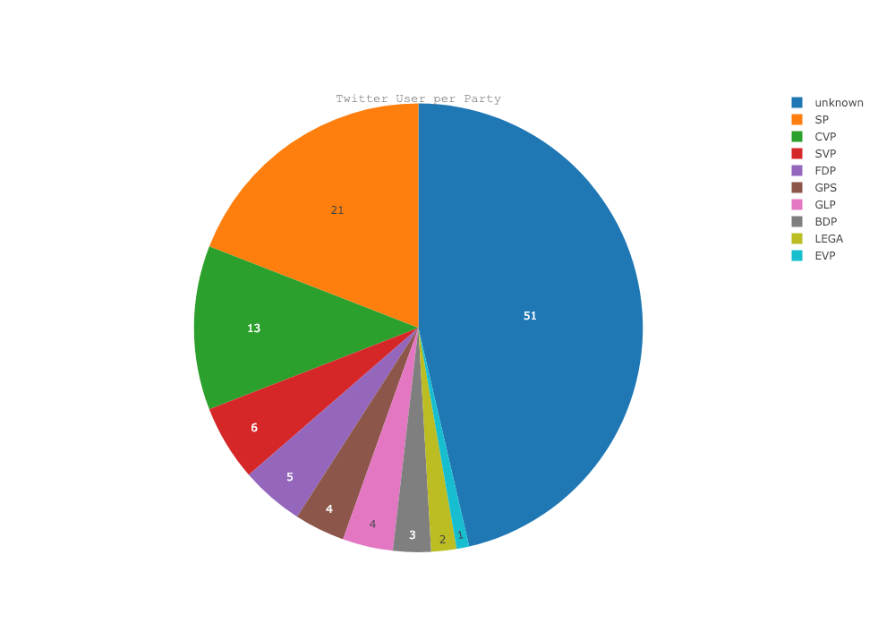
In the pie chart we aggregate the twitter account per party.
  def create_party_friends_count_bar_chart(self, df):
      data = [
          go.Bar(
              x=df.Party, # assign x as the dataframe column 'x'
              y=df.FriendsCount
          )
      ]
      py.plot(data, filename=self.__country_code+'-tw-party_politicans_count')
  def create_party_politicans_count_pie_chart(self, df):
      trace = go.Pie(labels=df.Party, values=df.PartyCount,
                     hoverinfo='label+percent', textinfo='value',
                     title="Twitter User per Party", titlefont=dict(
                          family='Courier New, monospace',
                          size=14,
                          color='#7f7f7f'
                      ))
      data = [trace]
      py.plot(data, filename=self.__country_code+'-tw-party_friends_count')
As one can see in the sample, various configuration parameters allow you to modify the layout of a chart. Head over to the
Plotly Python Open Source Graphing Library
to find out more about the various possibilities with charts, panda and plotly.
As one can see we have a lot of “unkowns”, i.e. we couldn’t identify the corresponding party by just analysing Twitter data elements. In the second part of this tutorial we will address this point.
Government Data API Factory

In the recent years, the availability of so-called open Government API’s exploded. It stems from the idea that data should be open, as Wikipedia describes the term of
Open Data:
“Open data is the idea that some data should be freely available to everyone to use and republish as they wish, without restrictions from copyright, patents or other mechanisms of control….
One of the most important forms of open data is open government data (OGD), which is a form of open data created by ruling government institutions. Open government data’s importance is borne from it being a part of citizens' everyday lives, down to the most routine/mundane tasks that are seemingly far removed from government.”
A good starting point for understanding for getting an overview of government data API’s is the programmablweb directory, which has an overall list of over 20’00 different API’s.
The government directory API category can be found here:
Two examples of Government API’s:
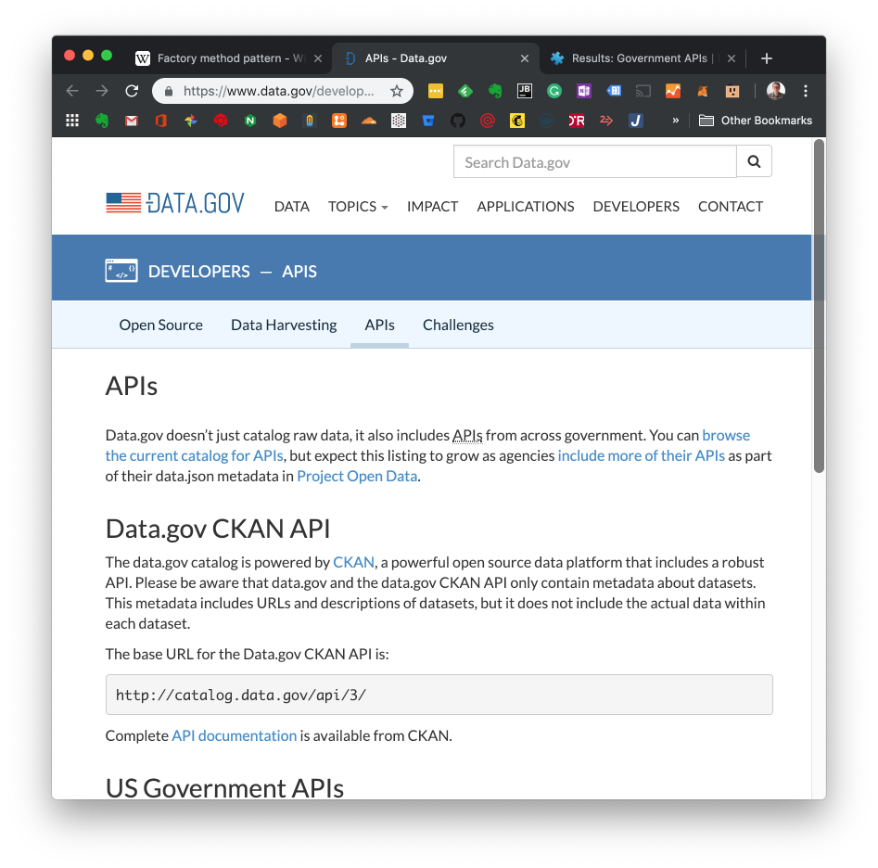
The data API of the US government:
https://www.data.gov/developers/apis
Or the Swiss Government API of the Swiss Parliament:
http://ws-old.parlament.ch/
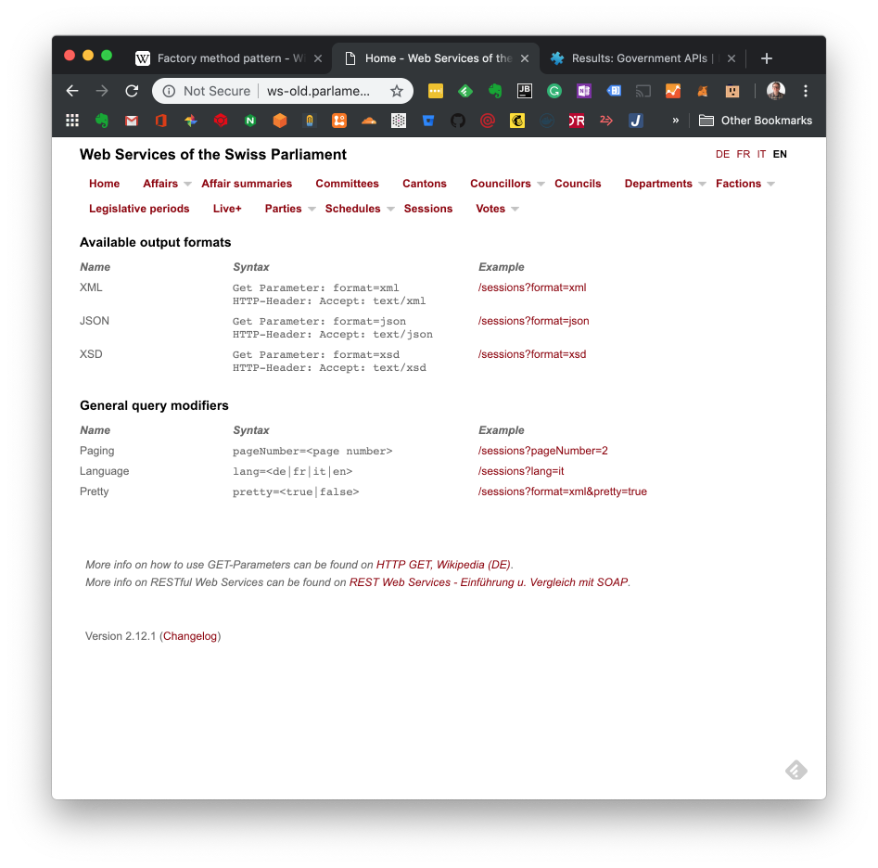
Well we will use the Swiss Parliament API’s to extract personal data of the parliament member (mainly the Party allocation) in order to increase the accuracy of our twitter matching algorithm.
Councillors Data
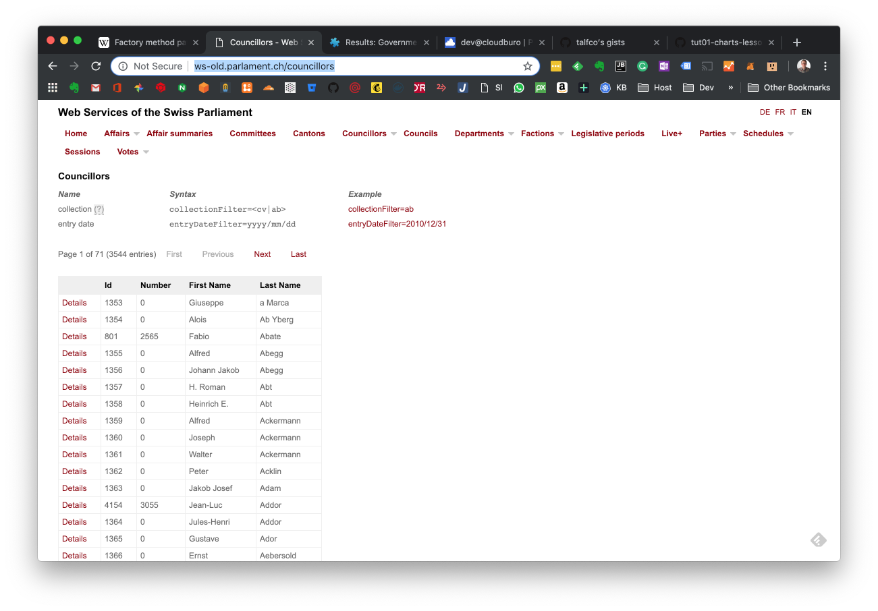
In order to get the data in a program readable form we have to attach the query parameter:
format=json. Which will return the content as a JSON document:
http://ws-old.parlament.ch/councillors?format=json
As we have already explained in our
second tutorial a public API which can return a lot of information, will use the concept of a cursor or paging mechanism in order to control the amount of data returned in one data request.
The Swiss Parliament API will return about 25 records in a request and will have in the latest record an attribute attached which tells you if there are more data available (
hasMorePages=true).
In case it sets to ‘
true’ you may fetch the next page by adding the query parameter
pageNumber=2 etc.
pageNumber=2 etc.

You will find such kind of information about the API normally in its user documentation, e.g. the Swiss Parliament API has some parameters to control the output format, language etc.

Having now a basic understanding, we can design our enhanced program which is capable of reading data from country specific government API’s. Let’s dig into the code.
Enhancing the Code - the UML Diagram
Introducing the government API in a general way needs some serious design and enhancement of our program. The UML class diagram of our enhanced program looks as follows (don’t be overwhelmed by the complexity, all the details will be explained later in this article).

Let’s summarize what we have done until now:
-
We created the GovernmentSocialMediaAnalyzer class in the second tutorial, which is capable of retrieving twitter relevant account data of politician of a country. We used a configuration driven based approach - based on YAML - to abstract the country specific data into a configuration file
-
Several methods were defined which allowed us to create panda-, as well as plotly specific tables and charts.
Now we will introduce three new classes
govAPIFactory, govAPI (an abstract class) and
govAPI_CH, which will build a generalized approach for connecting any kind of government API’s.
Factory Method Pattern
Software DesignPattern play an important role in Software design, as described by
Wikipedia:
“In software engineering, a software design pattern is a general, reusable solution to a commonly occurring problem within a given context in software design. It is not a finished design that can be transformed directly into source or machine code. It is a description or template for how to solve a problem that can be used in many different situations. Design patterns are formalized best practices that the programmer can use to solve common problems when designing an application or system.”
In our design, we will use the Factory Method Pattern to generalise the connectivity to a government API, which is explained by
Wikipedia as follows:
“In class-based programming, the factory method pattern is a creational pattern that uses factory methods to deal with the problem of creating objects without having to specify the exact class of the object that will be created. This is done by creating objects by calling a factory method—either specified in an interface and implemented by child classes,
or implemented in a base class and optionally overridden by derived classes
—rather than by calling a constructor.”
Our design will be based on the strategy, to define
-
a base class (parent - GovAPI) which is abstract and
-
a derived class (child - GovAPI_CH), which will have the country specific implementation (i.e Switzerland).
-
in the future we can introduce additional classes for example for UK: GovAPI_UK
Abstract Base Class GovAPI
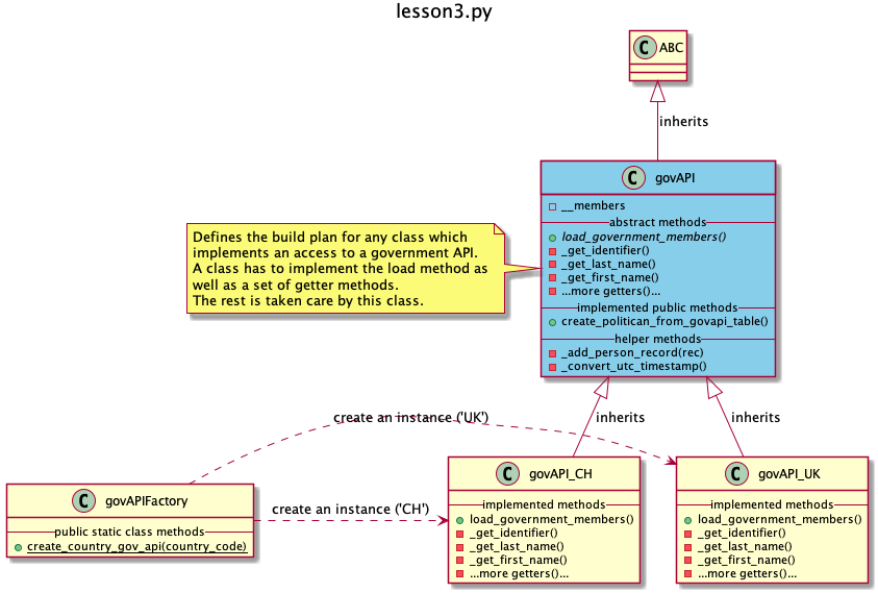
govAPI is an abstract class that contains several abstract methods. An abstract method is a a method that is declared, but contains no implementation.
In Python an abstract class is derived (or inherits) from the class ABC and will have one to more methods marked with
@abstractmethod.
  from abc import ABC, abstractmethod
  ...


  class GovAPI(ABC):
      @abstractmethod
      def load_government_members(self):
          pass
      ...
So the abstract class provides you a build plan, for any implementation class which inherits from this class. in our class the
govAPI_CH. What kind of methods does
govAPI_CH has to implement ?
First of all the implementation of the
load_government_members() method has to take care to fetch the politicians records from the government API
and each fetched record (which represent the data of a singe politician) must be passed to the method
add_person_record (which is already implemented by
govAPI base class)
The question now is, what the heck is the
add_person_record method doing ? Well look at the code below.
  def _add_person_record(self, dict):
      person = {
          'id': self._get_id(dict),
          'active': self._get_active(dict),
          'lastName': self._get_last_name(dict),
          'firstName': self._get_first_name(dict),
          'middleName':self._get_middle_name(dict),
          'gender': self._get_gender(dict),
          'party': self._get_party(dict),
          'council' : self._get_council(dict),
          'electedDate': self._get_elected_date(dict),
          'birthDate': self._get_birthdate(dict),
          'maritalStatus': self._get_marital_status(dict),
          'title':  self._get_title(dict),
          'statePostalCode': self._get_state_postal_code(dict),
          'district': self._get_district(dict),
          'zip': self._get_zip(dict),
          'townName': self._get_town_name(dict)
      }
      self._members.append(person)
The method is just preparing a target dictionary for our person record. I.e. the attribute names defined (
lastName, firstName, council etc.) are the names we want to use for any GovAPI implementation.
That means our retrieved record in the form of a dedicated government API implementation (i.e. in the form of the Swiss Government Parliament API) has to be transformed by using a bunch of getter methods.
Each of this getter methods is either abstract or returns an empty string. It’s the responsibility of the implementer of an inherited class (
GovAPI_CH) to provide the correct implementation.
  @abstractmethod
  def _get_active(self,dict):
      pass
  @abstractmethod
  def _get_id(self,dict):
      pass
  @abstractmethod
  def _get_last_name(self,dict):
      pass
  @abstractmethod
  def _get_first_name(self,dict):
      pass
  def _get_middle_name(self,dict):
      pass
  def _get_party(self,dict):
      return ''
  def _get_council(self,dict):
      return ''
The getter method implementations of
GovAPI_CH is shown below. It consists of a bunch of getter methods, which will return required attribute value out of the record.
  class GovAPI_CH(GovAPI):
      …
      def _get_active(self,dict):
          return dict.get('active')
      def _get_id(self,dict):
          return dict.get('id')
      def _get_last_name(self,dict):
          return dict.get('lastName')
      def _get_first_name(self,dict):
          return dict.get('firstName')
      def _get_middle_name(self,dict):
          return ''
      def _get_party(self,dict):
          return dict.get('party')
      ...
      def _get_birthdate(self,dict):
          return self._convert_utc_timestamp(dict.get('birthDate'))
      def _get_title(self,dict):
          return dict['salutationTitle']
      def _get_country(self,dict):
          return 'CH'
      def _get_state_postal_code(self,dict):
          return dict['cantonName']
      def _get_zip(self,dict):
          return dict.get('postalAddress').get('zip')
      def _get_town_name(self,dict):
          return dict.get('postalAddress').get('city')
      def _get_elected_date(self, dict):
          return self._convert_utc_timestamp(dict['councilMemberships'][0]['entryDate'])
The whole pattern visualized in a UML sequence diagram.
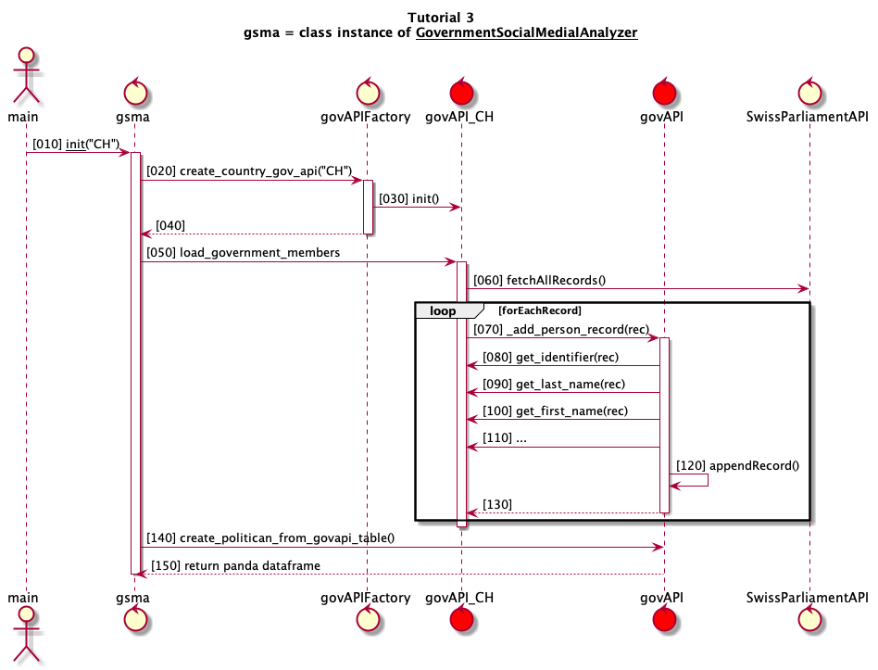
It’s important that you understand the responsibility of the various classes.
govAPI and
govAPI_CH are (red dots) are visible to the outside world (
govAPIFactory,
gsma) as one class instance. For the caller is irrelevant who is implementing which method.
From an internal view - by providing an abstract class
govAPI - we lay out a generic way to integrate any kind of government API, which can be plugged into our Government Social Media Analyzer Class. The ultimat goal of these two classes is to provide us a panda dataframe with detailed information about politican which we can further process.
tbd
Source Code
This blog entry was fully produced within Evernote and published using the
Cloudburo Publishing Bot
.
comments powered by Disqus