Polkadot Hello World #1: Cost-Effective Cloud Deployment of a Validator Node
This tutorial is based on Polkadot POC2.
The following article series “Polkadot Hello World" describes the steps and findings during my personal kickoff phase in the area of the Polkadot multi-chain framework.
In the last months, I was extensively researching projects in the area of blockchain and crypto with the goal to find a challenging visionary project, which allows me to build up know how and experience in this topic.
The project should be in the early inception phase in order to allow me to collect valuable insights about the evolvement of such an open source decentralized Web project (also known as Web 3).
I’m a strong believer that the decentralized Web - driven amongst others by the various Blockchain and Crypto innovations - will be the next big thing.
You know I’m an IT veteran, which was starting programming with the ZX81 back in 1981 (in Basic), moved forward with Pascal, Modula, Oberon to Java JDK 1.0 (1996), followed by Perl, TCL, Groovy, Javascript and a multitude of other languages and landed now for the next year(s) with Rust (which is a safe, concurrent system programming language, ideally for crypto and blockchain work).

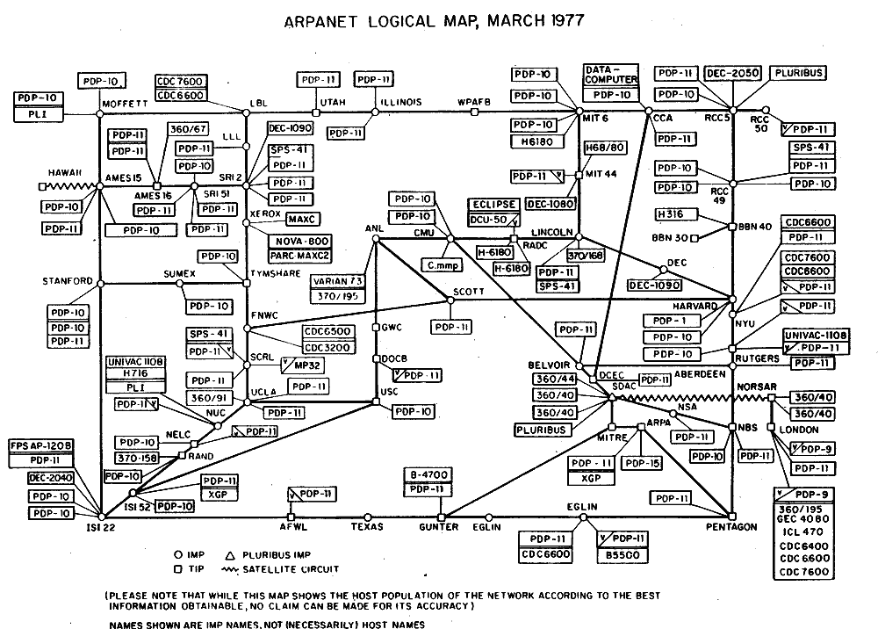
So I have seen in the last three decades several phases and tectonic shifts of the internet, which started initially purely in a decentralized manner (in the 70’ies with the ARPANET) and shifted to a heavy centralized internet nowadays.
There is a big shift in front of us, or as Josh Stark, states in his Medium Article “
Making Sense of Web 3”:
“Over the last decade internet-based services have trended towards centralization. Today, a handful of companies control the platforms we use to search for information, store our personal data, manage our online identities, and communicate publicly and privately.
At the same time, a group of seemingly unrelated technologies are being developed on the fringes of the tech industry, ranging from encrypted messaging to digital money. Within that loose community, “web 3” has become a catchall term for a vision of a new, better internet. An internet where payments and money are natively digital, where “decentralized” applications compete with centralized ones, and where users have more control over their identity and data.”
One of the most innovative and interesting projects in this area is Polkadot. Polkadot has the vision for a heterogeneous multi-chain framework, which connects blockchains and enables applications and smart contracts on one blockchain to seamlessly transact data and assets on other chains. You can find a good overview of the
Polkadot Light Paper.
Behind the Polkadot Framework stands Dr Gavin Wood, who is one of the founders of Ethereum, as well as Partiy. Parity is the company behind Polkadot and its roadmap foresees a going live date around Q3/2019 (DOT-token sales phase). So enough time to ramp up know how and watch how the product evolves and solves the challenges laid out in the white paper.
I have to say it requires quite some reading to get an initial basic understanding of the framework, but there is enough documentation material available as well as a vibrant community on
riot.
Let’s get started then
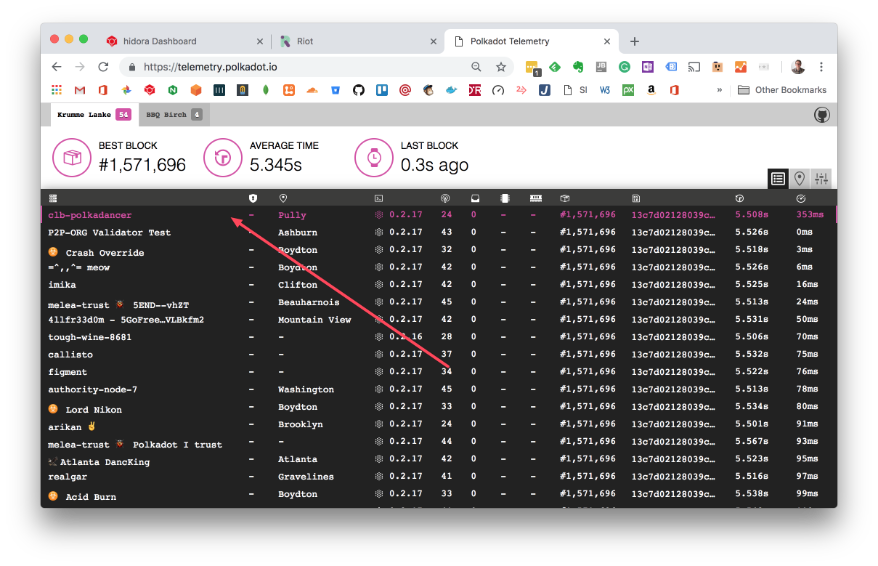
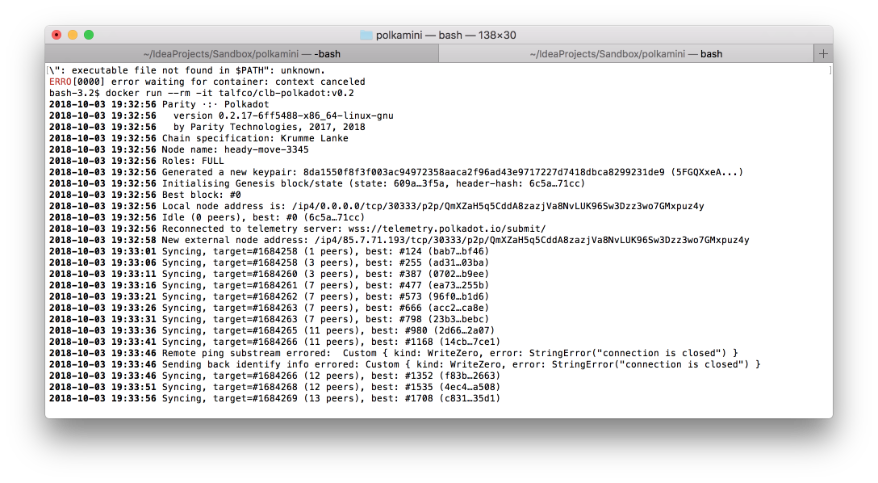
The first exercise I did, was the deployment of a Polkadot Verification Node as a dockerized cloud instance. I call it the “Hello World of the Polkadot Framework”. It’s quite straightforward and results - after some hours of syncing of the existing 1.5 million blocks - in a connected and synchronised Validator Node on the Polkadot “Krumme Lenke Test Network” (which is reflecting the POC-2 state of the project).
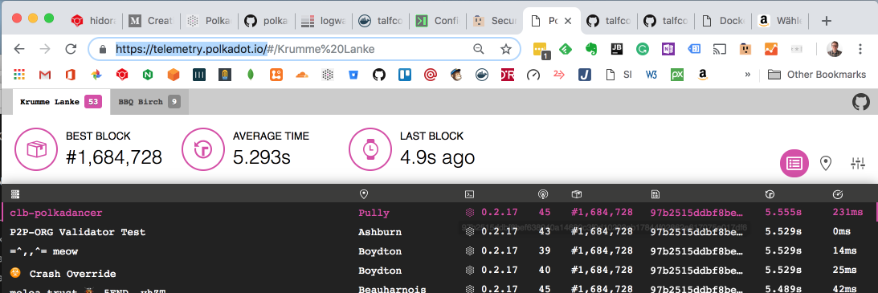
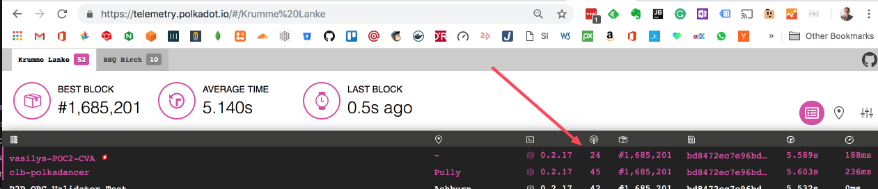
On the below screenshot, you see my node “clb-polkadancer” which is connected with 24 peers and processes around every five seconds a new block and adds it to its local blockchain (
telemetry user interface)
Be aware that the article covers the instantiating of the Polkadot Validator Node on Docker. To convert it to a fully trusted Polkadot validator node - which participates actively in the Proof of Stake (POS) consensus process - requires additional steps and will be covered in another blog article.
The Validator is one of the four basic roles which upkeeps a Polkadot network. The other three roles are
-
Collator
-
Nominator
-
Fishermen
Gavin Wood, depicts in his white paper the 4 roles and its interactions, as follows:
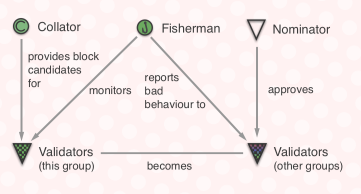
I will not go into the details here about the various role (refer to the
white paper) but just provide the Validator definition out of the white paper.
“A validator is the highest charge and helps seal new blocks on the Polkadot network. The validator’s role is contingent upon a sufficiently high bond being deposited, though we allow other bonded parties to nominate one or more validators to act for them and as such, some portion of the validator’s bond may not necessarily be owned by the validator itself but rather by these nominators.”
So what is his primary task then?
“A validator must run a relay-chain client implementation with high availability and bandwidth. At each block the node must be ready to accept the role of ratifying a new block on a nominated parachain. This process involves receiving, validating and republishing candidate blocks”.
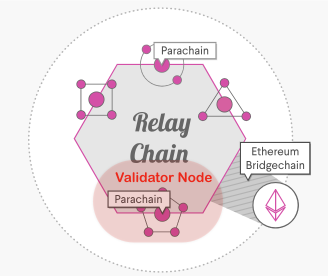
Ok, there are two new concepts introduced “relay-chain” and “parachain”, which may be new for you and are core concepts within Polkadot. Let’s try to explain them quickly not going too much into the detail by using the summary of the white paper:
"Polkadot is a scalable heterogeneous multi-chain. This means that unlike previous blockchain implementations which have focused on providing a single chain of varying degrees of generality over potential applications, Polkadot itself is designed to provide no inherent application functionality at all. Rather, Polkadot provides the bedrock “
relay-chain
” upon which a large number of validatable, globally-coherent dynamic data-structures may be hosted side-by-side. We call these data-structures “parallelised” chains or
parachains
, though there is no specific need for them to be blockchain in nature.”
Got it? So our Validator Node is part of the relay-chain and receives blocks and - in case the blocks belong to our managed parachain - will seal them in its fully synchronized parachain database. If the block belongs to a parachain which isn’t in our scope, then
“… it is expected that the validator will nominate the task of devising a suggested new parachain block to a third-party, known as a collator.”
So let’s get now a “highest charge” Polkadot role node up and running.
Just one last comment, highest charge has some stringent non-functional requirements:
“A validator must run a relay-chain client implementation with high availability and bandwidth
”
So in case you want to get nominated as approved Validator you must ensure that you run the node in a 7x24 fashion in order to stay in sync with the evolvement of your global parachain. Otherwise, the fishermen will detect this bad behaviour and punish you and potentially kicks you out of the consensus validator role.
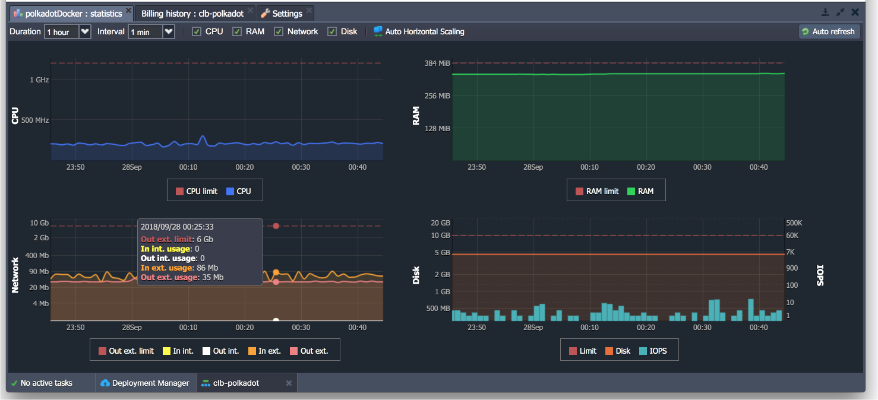
As one can see below, around every 5 seconds a new block is processed with a propagation time of 502 ms. Your node has to be ready to process and propagate such requests in a timely fashion.

Running a validator on your personal laptop or desktop may not be a good idea, so a Cloud-managed Validator Node is the way to go.
Finding a suitable Cloud-Provider
In the recent years, I was testing out and using various Cloud Providers (AWS, Google …) in order to run my side-project micro business, which is offering a subscription-based product called “Cloudburo Publishing Bot”. The solution allows you to manage your website(s) directly out of Evernote.
As a side-note: For example this article was initially written completely in Evernote and published directly to my
website
. If you are interested in such an blogging approach, head over to my
PublishingBot
site and get a free basic registration.
So having invested quite heavily in AWS Elastic Beanstalk I switched over recently to the
Jelastic Platform-as-a-Service platform, which provides an excellent Pay-as-you-use pricing model, ideally for micro business requirements (I could reduce my monthly costs substantially).
Another aspect which is really striking with Jelastic is, that there is zero service provider lock-in!
Jelastic PaaS offering is available across 60+ data centers in 30 countries worldwide. The infrastructure and local support are provided by the proven hosting partners listed in Cloud Union. Users can host their applications within hardware regions of a single provider or across multiple using the same technology
As for example, in my case, I’m running my Jelastic PaaS with a local Swiss vendor (
Hidora - Flex Swiss Cloud) in a data center in the Swiss Jurisdiction (no US tampering), but have the freedom to move my instances to any Service provider world-wide to data centres which may be under control of local service providers and not controlled by a centralized enterprise.

Cloudlets the base for the Pay-as-you-use pricing model
Jelastic PaaS prices are flexible and scalable. They are based on actual consumption so your bill reflects exactly what you use per hour.
This pricing model is based on resource units called “cloudlets”. Each cloudlet accounts for 400 MHz of processor speed and 128 MB of RAM.
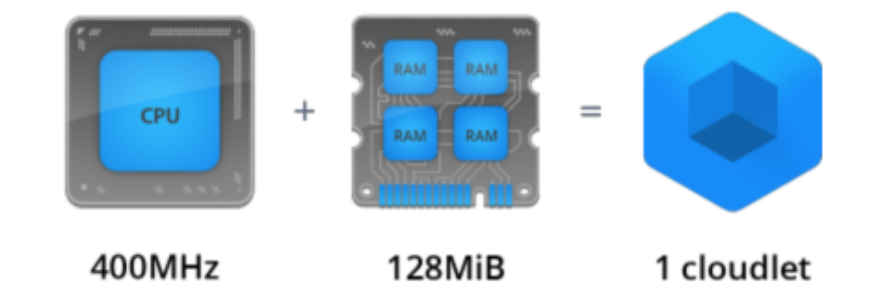
Jelastic PaaS offers you two types of cloudlets:
-
Reserved Cloudlets – a type of cloudlets that allows to get significant automatic discount rates. A number of resources you reserve beforehand and pay for it whether you spent all resources or not.
-
Dynamic Cloudlets – a type of cloudlets that allows you to pay based on your actual resource usage. Set your maximum resource consumption and the Dynamic cloudlets will add and remove automatically depending on your site load.
So after deployment of an application, you have to do some fine-tuning in the context of the reserved cloudlets in order to get an optimal prize. This can be easily done via the Dashboard in real-time without restarting any instance.
As we see later, it allows you to tune the cloudlets in real-time and check if there is an impact on your node block propagation time in the Polkadot Net.
Preparing a Validator Dockerfile
All my cloud projects (be it a Java based Bot or a Meteor Node.js based frontend) I run in a Docker container. This allowed me to standardise and automate the deployment and runtime configuration and tuning. So it was clear for me to deploy the validator node in a Docker image as well.
Polkadot already provides its own Docker Image “
chevdor/polkadot”, which is based on the “phusion/baseimage:0.10.1” which maps to the newest Ubuntu release 18.04.
Unfortunately, Jelastic PaaS is not Ubuntu 18.04 ready, so I changed the Dockerfile to be based on Ubuntu release 16.04 and made it available via Docker Hub under the name “
talfco/clb-polkadot”
Configuring the Validator Docker Instance
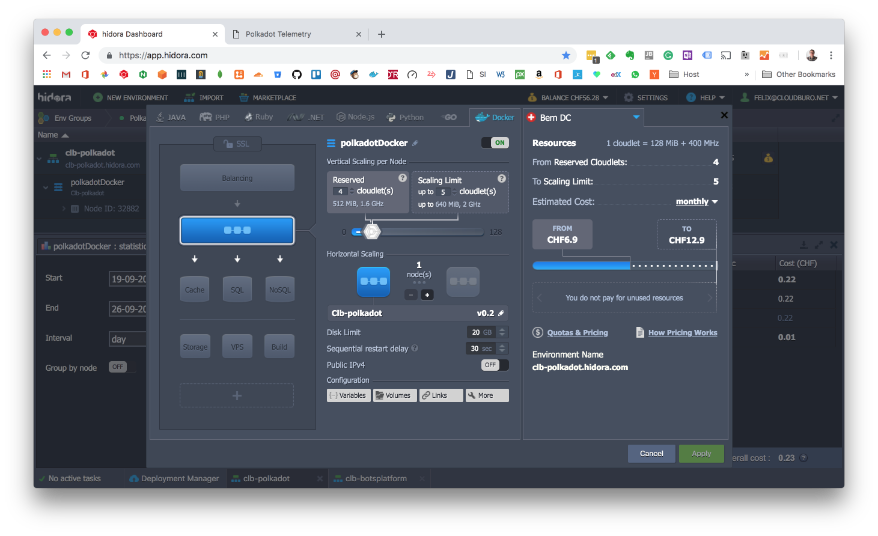
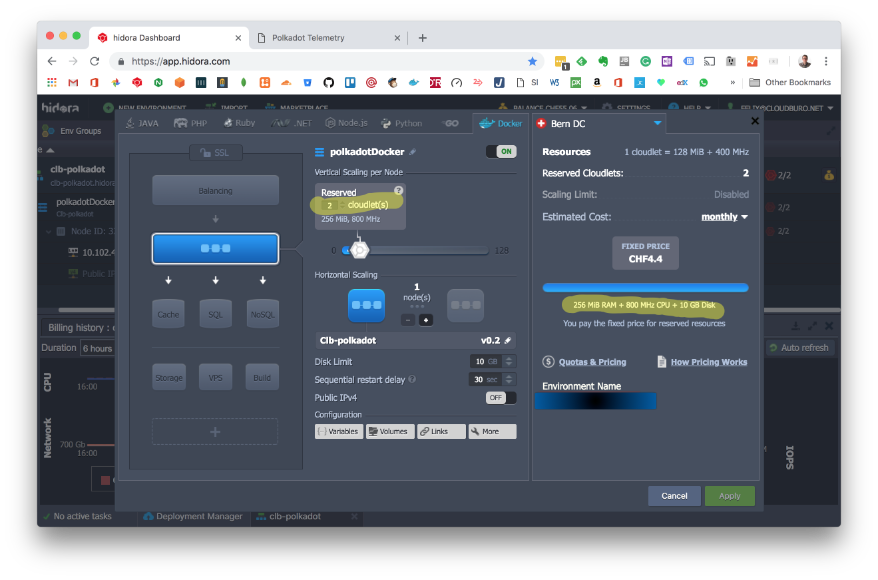
Within the Hidora PaaS I created a new Docker Environment “polkadotDocker” and loaded my clb-polkadot Docker image from Docker Hub.
The initial instance configuration for the resynchronization phase was 4-5 cloudlets, which gets translated to a CPU between 1.6 GHz - 2.0 GHz with 512 MB to 640 MB.
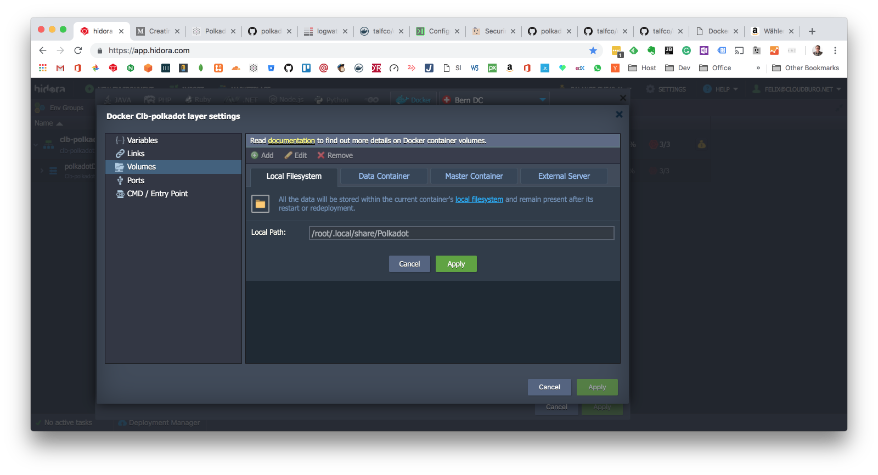
I configured the Polkadot database directory to be persisted on the servers local file system, in order not to lose our full parachain db after a re-deployment of a new docker image.
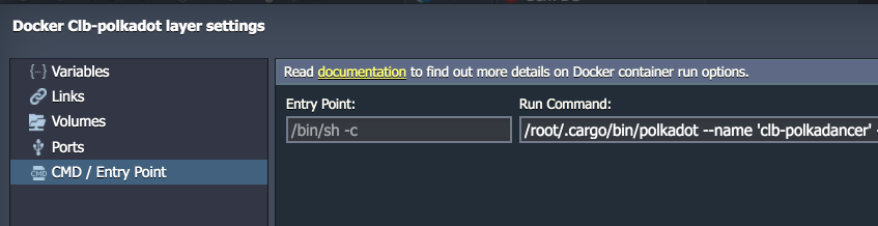
Finally,I added
—
name ‘clb-polkadancer’ parameter to the entry point.
Running your Node
That
’
s it. I started the instance, the log file will show the progress of the Syncing.
Head over to the
https://telemetry.polkadot.io/ where you should see your Validator instance and the syncing progress as well.
Building up a copy of the parachain DB
As a first step, the Validator node has to build up the complete parachain db on your local node.
As one can see in the below screenshot the chain build phase - which got finished around 14:30 - was using all CPU. After completion, the CPU usage was reduced to 200-250 MHz. To build up the full parachain of around 5 million blocks 6 hours of processing was required. Overall disk consumption is around 5 GB.
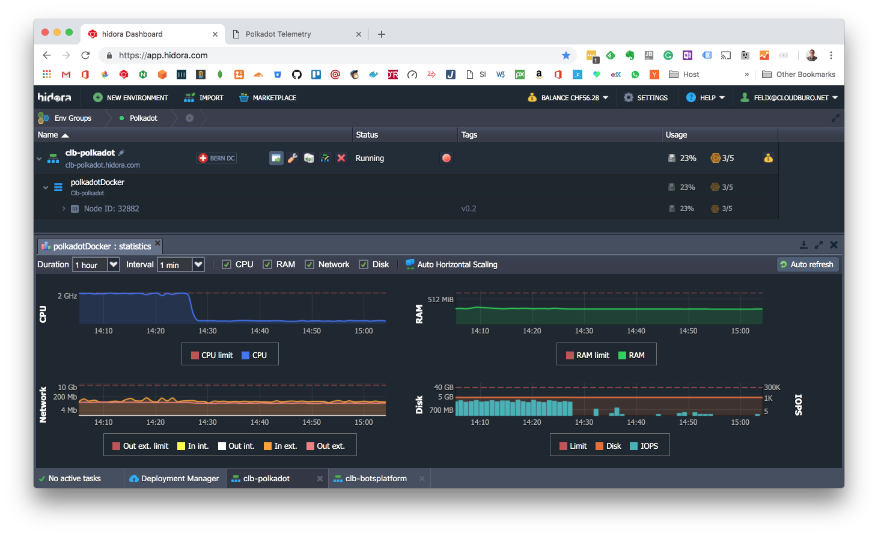
Having loaded the full parachain it’s time to reconfigure the instance. The first instance configuration tested out consisted of 2 cloudlets which get translated into 256 MB RAM and a CPU of 800 MHz.
Fine Tuning the Cloudlets
An assessment of the runtime statistics showed, that upper RAM limit (which is for 2 cloudlets 256 MB) of our node is always topped, which results in additional dynamic cloudlet charges, which is suboptimal.
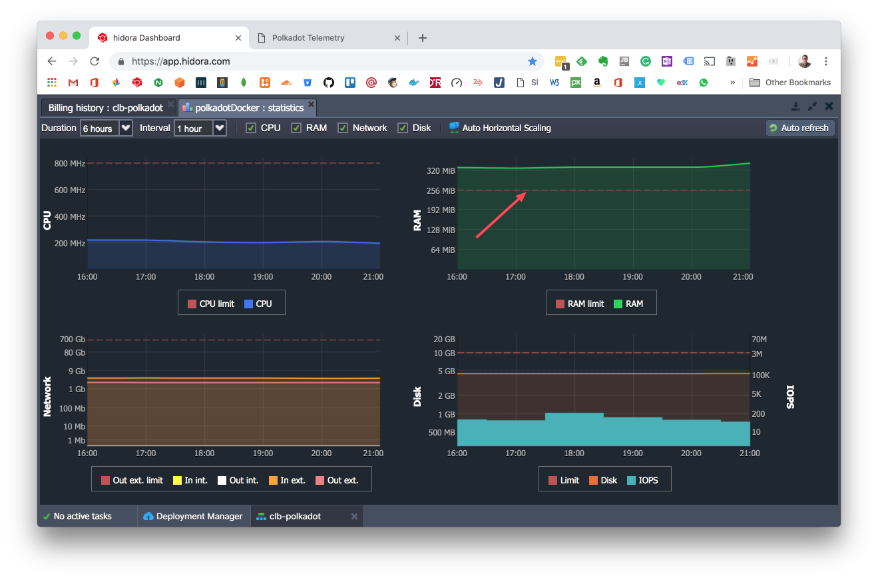
So let’s re-adjust our instance to 3 cloudlets, which results in a
-
384 MB RAM
-
1.2 GHz CPU
-
(10 GB of Disk)
As one can see in the above dashboard with 3 cloudlets configured for an instance, we can keep CPU, RAM, Network, Disk and IOPS below the upper limit. So this is the ideal configuration to run a Polkadot Validator Node.
A special look has to be taken for the Network traffic. The Validator is quite a bandwidth hungry process, you have to expect a network bandwidth of around 100-300 MB/min.
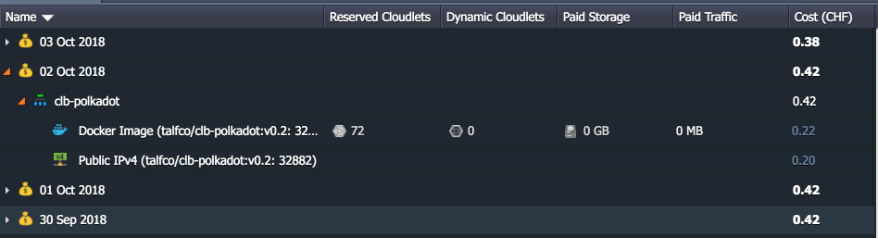
So what’s price to run a Validator Node 7x24 ?
An instance with 3 reserved Cloudlets, results in 24x3 = 72 Cloudlets per day which is charged with 0.22 CHF (around 0.20 USD). There is no Paid Traffic charges, because 1.4 TB/per month is free, which is more than enough to cover the bandwidth of the node.
As one can also see, there is an additional charge of 0.20 CHF per day for a Public IP4 address. This one is required due to the fact that we have to open port 30333 for public access, which requires that the instance has a public IP address as well.
Don’t forget: Opening the port
30333
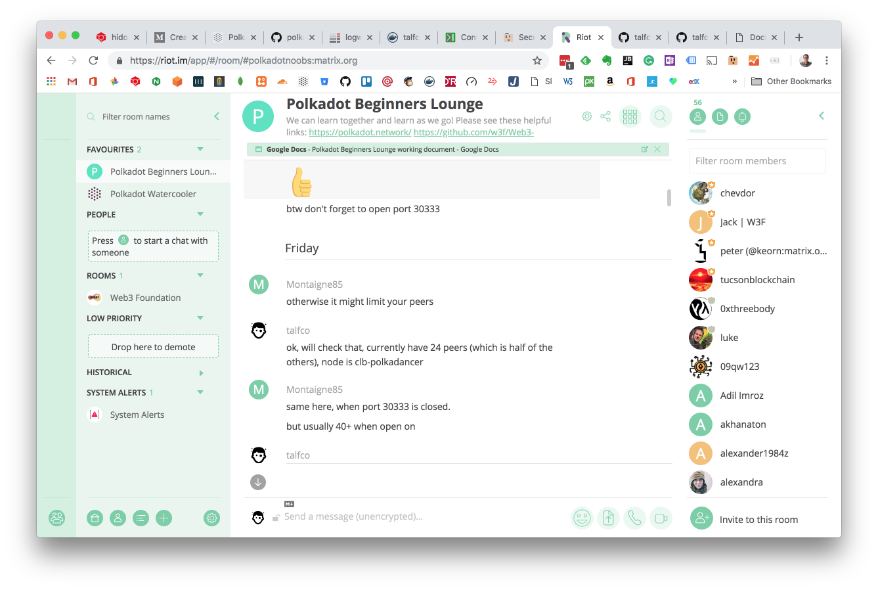
As one can see on this screenshot, certain nodes have only connections with half of the peers (24). My node was also showing that behaviour in the beginning as well.
With the help of the Polkadot Beginner Lounge on Riot I could quickly solve this problem. My Docker Instance was exposing some general purpose ports, but not 30333 used by the Polkadot Validator.
In the context of my PaaS, it was necessary to associate a Public IP with my node to open the port, which results in the above 0.20 CHF per day.
All in all, a full Validator is charged 0.42 CHF per day, which results in monthly costs of around the price of 2 Starbuck coffees in Switzerland or 3 in Tokyo. So dependent on your global location you have to adjust your coffee consumption slightly that you can run your own Polkadot Validator node.

That’s it for today, in the next article we will transform our Polkadot Validator in an
official Validator which will take part in the Proof of Stake (POS) consensus process.
Stay tuned …
This blog entry was fully produced within Evernote and published using the
Cloudburo Publishing Bot
.
comments powered by Disqus