Table of Content
- and how to activate them. For more information, see interfaces(5).
- The loopback network interface
- The primary network interface
Target deployment for production will be the Amazon AWS cloud stack executing on top of Ubuntu Amazon Machine Image. Currently foreseen is an AMI for the Ubuntu Server 12.10 of architecture AMD 64bit. Any
Each AMI is a machine template from which you can instantiate new servers. Each AMI has its own unique ID
The goal is to use a standard template offered by Amazon via EC2(refer to Amazon AMI Locator and have a highly automated deploying process on top of that for installing all required software, as well as the Cloudburo platform and apps.
Salt Configuration Mgmt System
For the automation we will take Salt. Salt is a
- a configuration management system, capable of maintaining remote nodes in defined states (for example, ensuring that specific packages are installed and specific services are running)
- a distributed remote execution system used to execute commands and query data on remote nodes, either individually or by arbitrary selection criteria
It was developed in order to bring the best solutions found in the world of remote execution together and make them better, faster, and more malleable. Salt accomplishes this through its ability to handle large loads of information, and not just dozens but hundreds and even thousands of individual servers quickly through a simple and manageable interface.
Setup Test Deployment Env
The following setup is done using the Oracle VM VirtualBox Manger on a Max OSX system.
Task: Create Ubuntu Guest System
This is straighforward, download from the Ubuntu Homepage a up-to-date version (ISO format) a Ubuntu Server, e.g. ubuntu-12.10-server-amd64.iso. Create a new guest system in thea Virtualbox (wizard driven) and do a default installation of the Ubuntu Server (incluede the openssh package as a minimum).
After having completed these steps you have your Ubuntu guest system running which is connected to the Internet only (supposing that you did a default installation), this means the host system (Mac) doesn’t know and can’t access the guest and vice versa. In order to enable that you have to configure a host to guest network interface.
Task: Add Additional Host-only Network
Go to top menu Virtual Box -> Preferences select the tab Network and add a new Host-only Network
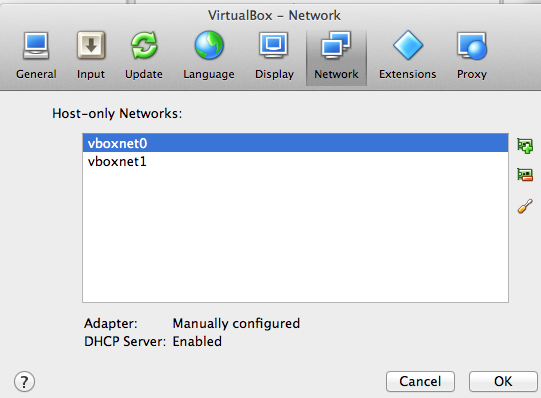 “Screenshot Host-only Network” %}
Task: Configure host to guest network interfaces
Open Virtual Box Settings Menu and select Network tab. Add a second network adapter (Host-only Adapter). Refer to screenshot (in your setup that would Adapter 2, for the Advanced part take the default). Select the corresponding Host-only Adapter.
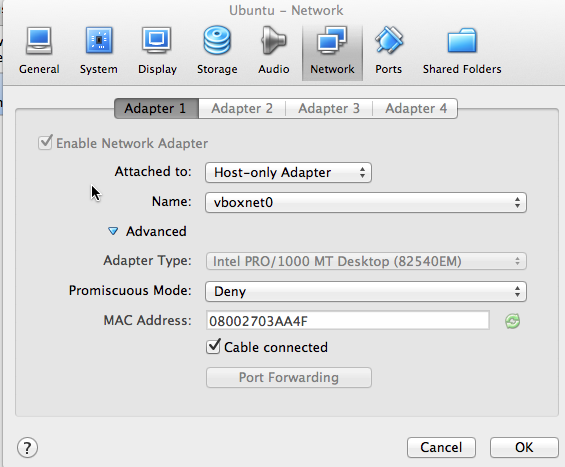
For our example below we have it configured to an adapter called vboxnet1.
Task: Enable ssh connection from host to guest
My host is a OSX based iMac machine. Having now setup the additional network adapters I could check it’s configuration on the host, by running
iMac:~ Felix$ ifconfig vboxnet1
vboxnet1: flags=8843<UP,BROADCAST,RUNNING,SIMPLEX,MULTICAST> mtu 1500
ether 0a:00:27:00:00:01
inet 192.168.57.1 netmask 0xffffff00 broadcast 192.168.57.255
My assumption was that I now can login via ssh via 192.168.57.1, which is also pingable. Doing a ssh against this address will result in a ssh login to your host system (and not the guest one).
Obviously this Host-only Adapter vboxnet1 cannot be used as access point to the Ubuntu guest system. You have to configure another adapter in the Ubuntu Guest system which is in the IP range of the vboxnet1. e.g. you can define for it the IP address 192.168.57.10.
Login to the Ubuntu guest system and open the following interface configuration file
felix@ubuntumaster:~$ sudo vi /etc/network/interfaces
The file will contain something like this
# This file describes the network interfaces available on your system
# and how to activate them. For more information, see interfaces(5).
# The loopback network interface
auto lo
iface lo inet loopback
# The primary network interface
auto eth0
iface eth0 inet dhcp
Now add a new eth1interface definition to the end of the file and save id
auto eth1
iface eth1 inet static
address 192.168.57.10
netmask 255.255.255.0
Having done that bring up the new interface.
felix@ubuntumaster:~$ sudo ifup eth1
Now you can directly login from the Mac machine via ssh to the Ubuntu guest system
iMac:~ Felix$ ssh [email protected]
[email protected]'s password:
Welcome to Ubuntu 12.10 (GNU/Linux 3.5.0-17-generic x86_64)
Last login: Sun Feb  3 01:31:12 2013 from 192.168.57.1
felix@ubuntumaster:~$
Remark for a RedHat Fedora system
I did a same setup with a RedHat Enterprise Linux system, where the interfaces are defined a little bit differently. So go to the following directory
cd /etc/sysconfig/network-scripts/
Add a new file ifcfg-eth1 and put the following content (adjust your ip address to the range of your vboxnet
DEVICE=eth1
TYPE=Ethernet
ONBOOT=Yes
NM_CONTROLLED=yes
BOOTPROTO=static
IPADDR=192.168.58.10
NETMASK=255.255.255.0
Run the following command
service network restart
That’s it you should now have a ssh connection to your RedHat VM.
Remark Internal Network setup
Similar steps necessary as above described:
- Add a third adapter of type Internal Network
- In the Name dropbox select a unique name, make sure that each machine participating in the internal network is using the same unique name
- Write down each MAC Address shown in the Network Tab window (below Advanced section)
- Configure the network adapter in the VM’s, for example for RedHat Fedora it would look like:
[felix@localhost network-scripts]$ more ifcfg-eth2
DEVICE=eth2
HWADDR=08:00:27:FF:80:FD
TYPE=Ethernet
ONBOOT=yes
NM_CONTROLLED=yes
BOOTPROTO=static
IPADDR=193.1.1.1
NETMASK=255.255.255.0